Wednesday, June 30, 2010

Lumpless Binding Tutorial - No Rulers or Pencils Needed!

I mentioned while we were in Texas that I finally figured out a lumpless binding method that worked for me that didn't involve rulers or drawing lines.  I thought I would share it with all of you in case anyone else was lumpless binding challenged like I was.

Step 1 - Make your binding as you normally would.  For this method, it doesn't matter your starting strip width.  My binding strips are either cut 2 inches for my small quilts or 2 1/4 inches for my large quilts.  I sew the 2 inch bindings on with a quarter inch seam allowance and the 2 1/4 inch bindings are sewn on with a 3/8 inch seam allowance. 

Step 2 - Begin sewing your binding on about 8-10 inches from the starting point (i.e. leave a long tail to start).

Step 3 - Attach the binding as you normally would, but stop approximately 8-10 inches from the end of your starting strip (i.e. this leaves you with an 8-10 inch tail at the beginning and end of your binding at this point).

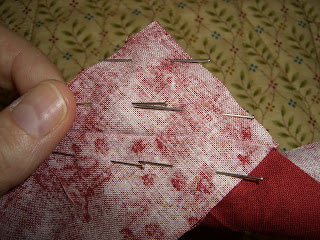
Step 4 - Take your quilt to the ironing board and press the end of your beginning binding tail at a 45 degree angle, like this (i.e. towards you).  Ignore the partial piece of fabric you see in the upper right.  We'll get to that later.  I couldn't crop it out of the picture and still leave the part I wanted to show.


Step 5 - Take your tail from the beginning of the binding and lay it flat on the quilt as it would be if it were sewn down.  Don't stretch or pull.  Just lay it nice and flat and pin it in place.


Step 6 - Take your other tail and lay it flat on the quilt the same as you did for the beginning tail, including laying it on top of the beginning tail that is pinned down.  Then, fold back the ending binding tail onto itself with the fold falling even with where the folded fabric in the previous picture ends on the beginning tail (i.e. where the right side of the long triangle edge meets the wrong side of the binding fabric).  It might help to unfold the first strip so you can see that you have the ends matched up.  I should have taken a picture like that instead of the second picture below, but hopefully you can figure out what I'm saying.  What looks like a seam in the second picture is actually the fold over line from the beginning tail.  THIS IS THE MOST IMPORTANT STEP SO YOU NEED TO MAKE SURE YOU'VE GOT THE FABRICS LINED UP AS INDICATED.


Step 7 - Once you are satisfied that you have the fold in the right place, pick up your scissors and cut the fabric as straight as you can on the fold.

Step 8 - Press the ending tail at a 45 degree angle like you did for the beginning, but the ending tail will be pressed away from you.  Unpin the beginning tail and your binding ends should look like this.  When you spread the two pieces out the folds should touch each other and it should look like one piece of fabric, but I wanted to separate them for photo purposes.


Step 9 - Pick up your binding ends with right sides together and all edges and the folds matching up.  Don't twist either piece, just unfold each end so you have right sides together.  Put another way, think of it like you are picking both ends up with one hand and pinching them together at the fold line with right sides of fabric together.  Pin securely and take your quilt to your sewing machine.  If this is sounding a bit familiar at this point, it's because this is probably how you attach binding strips together when you are piecing your binding in the first place, except maybe you draw your sewing line, or cut your strips off at a 45 degree angle like I do.  The only major difference is that you now have the added challenge of wrestling with your quilt while you sew this final seam.


Step 10 - Sew the ends together using the fold line as your sewing line.  Unpin, trim your seam allowance to 1/4 inch and press the seam open.

Step 11 - Re-press your binding if necessary and finish attaching to your quilt.  Wa La, you have now completed a lumpless binding finish.  Doesn't it look great?


Please ignore the double seam lines.  I forgot to adjust my needle position after sewing the ends together.  Since I needed a wider allowance I just sewed another seam and left the other one in place rather than ripping it out.

I hope these instructions make sense.  If not, please leave any questions in a comment or send me an email.  I scheduled this to post while I was gone on vacation with no internet access, so I won't be able to answer questions immediately, but I will respond as quickly as I can once I return.

Monday, June 28, 2010

To Label or Not to Label - Conclusion

Thank you to everyone that commented on this post regarding whether or not I should label all of my finished quilts, including those that will be sold.  After reading all of the comments and putting some more thought into the subject, I have concluded that I really do want to label all of my quilts, both small and large, and not because I'm being guilted into doing it.  As many people pointed out, if nothing else, I should take credit for my work.  With all of the time and effort we put into our quilts, I certainly can't disagree with that argument.

I think the thing that was holding me back was that most of my quilts aren't made for a specific purpose and I don't know that a quilt I decide to keep today won't be sold 5 years from now.  I was afraid that a buyer wouldn't want a 5 year old quilt, for example, but I decided that as long as I identify the quilt as coming from my personal collection and the actual age and condition of the quilt at that time, I should be fine and can leave the original quilt label as is.  Basically, I didn't want to waste my time making and attaching labels only to have to remove or change them later.  That said, if I were to pull a quilt from my collection that is not a current quilt and I intend to give it as a gift, I would certainly remove the label and make a new one with personalized information for the recipient.  I don't make many gift quilts, so there shouldn't be too many "re-do's" of labels.  I don't add my labels until the quilting is done, and don't plan to change that practice, so if I sold a quilt and the buyer really didn't want a label on it, they could always remove it.  However, since my labels are removable, I think I will come up with some other small unique marking that I can inconspicuously put on all of my quilts to identify them as mine. 

So that's my conclusion on quilt labels.  I guess as soon as I'm back from vacation I best get cracking on catching up on my labeling because I am waaaaaayyy behind :-).  Now that I've finally settled on a "procedure" that I think will work for me, I'm anxious to get it implemented.  Thanks again for all of the input!

Friday, June 25, 2010

I'm off to North Dakota & Minnesota

I'm getting out of this heat for a couple of weeks and will be taking off into the wild blue yonder this afternoon to head home to North Dakota and Minnesota to see my family.  I spent the first 20 years of my life in North Dakota and spent many a vacation in Minnesota where most of my mom's family lives.  It will be really nice to see everyone.

I will have virtually no internet or email access while I'm gone, other than maybe a day or two in the second week, but I've scheduled some posts for while I'm away.  Some of the highlights of those posts include tutorials for making lumpless binding without the use of a ruler or marking utensils, crocheted dishcloths, and crocheted cat mats.  Also, Koda and Maya each have a day where it's all about them.  Even though I won't be able to read or respond to comments while I'm gone , I'd still love to read them when I return, so please feel free to leave comments on any of those posts if you are so inclined :-).

Have a safe Fourth of July and I'll see you all in a couple of weeks!

Thursday, June 24, 2010

Placemats are Done!

My sister selected some fabric and a pattern and requested a tablerunner for last Christmas.  Here is the finished tablerunner.  The red fabric is a 3 Sisters fabric for Moda called Peace on Earth and it's gorgeous!


A closeup of one block:

 
And the back showing the quilting:


You are probably wondering what this tablerunner has to do with the placemats I refer to in the title of my post.  Well, there was plenty of fabric left over, so I told my sister that I could make matching placemats for her, but that she wouldn't get them until after tax season.  That was fine by her.  Then after I booked my trip home this summer, for which I leave tomorrow, I just had to get them done so I could bring them with me.  I cut them out in April and finally got them finished this week.

I about had a heart attack when I was cutting the last two centers as I forgot about the directionality issue with the fabric and cut them the wrong way.  Thankfully I had enough fabric to re-cut them.

A single placemat followed by the complete set:


A closeup of the quilting:

And the back:


Echo was VERY helpful during the quilting process.  I quilted the placemats over the course of a couple of days and both times Echo came and laid behind the sewing machine and watched.  He was really good except for the one time he grabbed the thread.  After he got banned from the room for awhile after that, he learned that he could stay if he just looked but didn't touch.

He supervised the work on the left side of the needle:


And on the right side of the needle:


Silly boy!

Wednesday, June 23, 2010

Thrift Store Find

DH and I went to Savers, a local chain of thrift stores, a week or so ago to look for books for him and I wanted to see if they had any cute curtain rods I could use to display my small quilts.  I didn't find any curtain rods, but as I was looking around, I spotted these:


They are fabric foundations for piecing the following quilt patterns: Flying Geese borders in two sizes, Square in Square with two pattern choices, Hunter's Star, New York Beauty, and Uneven Log Cabin.  The pieces are one yard each, so there are only enough patterns for small quilts, which was fine as I don't know that I'd like to use this technique for making a large quilt.  They were only $1.99 each, which I thought was a great deal.  If I try one and don't like the technique, I'll just put them back in the donation pile for someone else.

Tuesday, June 22, 2010

Bargello Quilt Finished!

I was looking through my list of finishes for the year and realized that I had forgotten to blog about finishing my Bargello quilt.  I finished stitching down the binding on this quilt while we were in Texas.  This quilt is one of my favorites of all time.  The border is purple (shocking, I know), so in person this quilt really reads as a purple/pink quilt with quite a bit of color, but for some reason, it doesn't like as bright and colorful to me in the picture as it does in real life.  You will have to trust me when I say that it's a fairly colorful quilt :-).

I used Bonnie Hunter's pattern and the leftover strips from a Scrap Swap Club to make this quilt.  I finished this top in 2006, basted it for hand quilting, started that process, hated how it looked due to my lack of handquilting skills, unbasted it, and then put it back in the drawer.  It sat in that drawer until this past spring.

One of my 2010 goals is to quilt 10 UFO quilts waiting for quilting.  This was the first one I completed.


A close up of the quilting:


And the back:


I used King Tut #937, color Tiny Tuts for the interior quilting, YLI Vineyard in the border, and a Coats & Clark cotton thread in cream in the bobbin.

Monday, June 21, 2010

Nancy Halverson Stash Enhancement

I have been trying to be very selective of my fabric purchases lately and Nancy Halverson's new Christmas line, Tidings, was on my list.  Prior to last year, I had a couple of Nancy's books in my stash, but had never made any of the projects or collected the related fabrics.  Then she came out with her I Believe line last year and I was hooked.  Not only did I want to make every project in the book, but I loved almost every fabric in the fabric line.  Dawn and I went shop hopping one Saturday and we managed to find enough of a selection to get me started and then I filled in the rest with a couple of on-line orders.  Since then, I've acquired a few more of her books so I have more projects for which I need her fabric LOL. 

This was my Nancy Halverson fabric collection as of 2009, except for one of the yellows that is some other fabric line, but which I am already using in my first "I Believe" project, the one that started it all LOL.  Oh, and the burgendy on the end isn't Nancy's either, but will be used for the main quilt in the I Believe book.  Aren't they gorgeous?


The thing I realized right away while collecting this first batch was that while Nancy's fabrics play very nicely amongst themselves from one line to the next, they do not play very nicely with the other fabrics in the sandbox.  This kind of bummed me out since I have such a large stash that I'd like to use, but I decided that I would just keep building my "Nancy" collection and then choose from that when making her quilts.  I keep it separate from the rest of my stash so it doesn't accidentally get used for something else.

So back to the new Christmas line, Tidings.  I found that one of my favorite local stores had the entire line, but decided that I needed to wait for a sale to get it since it was priced at $9.99/yard.  I figured they would have Christmas fabrics on sale in July and that I'd pick them up then or end up getting them on-line if they didn't have a sale.  As luck would have it, Dawn and I had a quilting day on Saturday and she alerted me to an email coupon that the store had sent out for $10 off a $50 purchase.  We were planning to go there anyway to look for a fabric for her project, so we printed two coupons and were on our way.

They didn't have her fabric, but I hit the jackpot and not only got the Tidings fabric that I wanted, but some beautiful pieces from the Garden Song line, which is one of the books I have.  We split the purchase so we could each use a coupon (sort of cheating I know), but it brought the price per yard down to about $8-ish, which had been the price I decided I could pay.  Too bad our sales tax is now 9.8%, which added almost $10 to the total price.  Blech.

Anyway, here are the beautiful blues, pinks and creams I got:


And the reds, greens, and golds:


Oh, and Dawn has been using this fabric in the quilt she's currently making and I've wanted some ever since she got it so I picked up a third of a yard of this one too.  I might have been able to resist if it was just dots, but dots wtih lime green.  Well, that was just too much to resist.  LOL


Sunday, June 20, 2010

Sammy's Scrappy Cat Mat is Done!

Once I started this project, I just couldn't put it down!  I couldn't wait to see what color came up next in the ball.  You can read the background this project here.  You'll have to scroll to the end of the post.

I was about three inches short when the entire ball of scraps was used up, so I just cut pieces from some other yarns in my stash to finish it off. 

Here is the side #1:


And here's side #2:


And here is the kitty pic for the day.  Echo has to supervise whenever someone is doing the dishes (usually DH - yeah for me!).  He hangs his paws over the edge and just watches everything intently, but never tries to touch anything.  This is him this morning while I was doing dishes.

Thursday, June 17, 2010

Bad Maya!

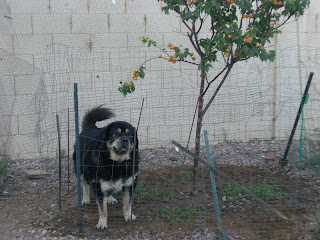
Yesterday morning it wasn't the birds that got into the apricot tree.  I went to bring Koda in from barking at the gate and look at what I found:


Bad Maya!  Of course she couldn't figure out how to get out, even though she had gotten in, so I had to wake DH up at 6 a.m. (he's NOT a morning person) to help since I didn't want to mess up his "system" he's got going out there.  That, and I honestly wasn't really sure how he had the fencing put together.  Turns out he just lifted it up for her to walk out, so now I know for next time, although there better not BE a next time. 

How she managed to get through the netting on the outside without getting tangled is beyond me. I find it a challenge and I even have hands and fingers to work with!  And, she jumped the fence even with her bad leg (she blew out her knee a few years ago).  I guess anything is possible if you are motivated enough.

Remember I told you that Maya and Koda killed the previous apricot tree? Well, they did it by trying to "pick" their own apricots. When they got higher than they could reach, they just ripped the limbs completely off.  Maya did manage to get one apricot yesterday, but thankfully didn't do any damage to the tree.

The tree had also just watered a couple hours before, so check out these nice muddy feet Maya was sporting from her adventure.  Needless to say she had to stay outside for awhile until they dried a bit.


On a hobby note, I have been having fun this week with a new crochet project.  I had all of these leftovers from my dishcloths that weren't big enough for anything I wanted to make, so I tied them all together one day while watching movies and wound them into a big ball.  I've been using them to make a cat mat for Sammy's chair instead of using a towel.  It's worked in the round so it's a double thickness.  Many of the pieces were so small that a sane person would have thrown them away, but like my quilting, I save every little scrap.  In this case, I'm glad I did because I'm really liking how this is turning out.

Here's side 1 so far:


And the other side:

I can already tell that it's likely I won't have enough yarn for the size mat I want to make, but that's ok.  I'm still making dishcloths, so I'll just keep adding on as I generate more scraps of yarn.


Tuesday, June 15, 2010

Cat or Rabbit???

I've discussed before that Sassy is not only a thief with regard to small household items, but is also obsessed with people food.  We can't leave any kind of plate with food sitting out unattended if she's around and she generally gets locked in the bedroom when meals are being cooked. 

Yesterday I was making a salad for lunch and while I was distracted, she jumped up on the counter and stole a piece of lettuce right out of the bowl.  I thought surely she was just going to play with it rather than eat it, but no, she gobbled it down in about 3 seconds flat.  So for kicks, I gave her another one.  I figured after she tasted the first piece, she wouldn't be interested in the second piece.  It didn't have dressing or anything, so how much taste would it have for a cat?  Here's her chowing on the second piece.  It was gone as fast as the first one.


And with her third piece, also gone as fast as the other two.  At that point I put her in the bedroom so I could finish making and eating my salad in peace.


On an unrelated note, thank you to everyone that left comments on my last post about labeling quilts.  I'm still pondering a bit, but I think I've made some decisions as to my personal "quilt labeling" policies.  I'll do a follow up post when I get things ironed out.

On another unrelated note, I still have some Christmas and 30's fabric for sale in this post.  If you are looking to add either of those types of fabric to your stash, please check it out.

Sunday, June 13, 2010

To Label or Not To Label - Opinions Please

Now that I have been finishing all of those small quilts lately, I am once again stuck with the dilemma of whether or not to make labels for all of them.  Truth be told, if I wasn't always reading about how you "have" to label each quilt you make for posterity sake, I'd consider them done when the last stitch was made in the binding and feel no guilt whatsoever about not adding a label.  That said, if there is special significance to a quilt, or it is a gift, I do make a label and have no problem doing so.

My dilemma is with all of the quilts that I make "just because", which is probably 99% of the quilts I make.  Since I have limited room and limited recipients for whom I would make a quilt, I'm guessing that most of quilts that aren't "must keep" quilts for me will end up being put up for sale eventually, and even some of those I keep may be sold eventually when newer ones  that are "must keeps" get added to the collection.  I'm working on a separate blog right now that will just be for selling.  I have extra stash to sell, both quilting and cross stitch, and will also post any quilts for sale as well, in addition to possibly putting them on Etsy.  As far as using a label to remember when I made the quilt, I already keep a journal where each quilt has a page with pertinant details about that quilt, including the finish date, so I've got that covered already.

So here are my burning questions:
  • Do you feel that EVERY quilt you make must have a label and why?
  • If you were to buy a quilt from someone else, would you want a label on it or not?  Please note, even if I were to put labels on quilts I sold, they would not be quilted in so the purchaser could easily remove the label and pass the quilt on as their own.  So that could happen whether I label the quilts or not.
  • How do you feel about simply signing the quilt with a pigma pen, or sharpie?  I find this difficult because it's hard to write on a finished quilt, but if I remembered to do it before the quilt was finished, I could stabalize with freezer paper first.  Of course, that would mean that the quilt would need to be quilted and bound immediately instead of the top marinating in the drawer for several years before the quilt actually got finished.  I also find that I use alot of darker fabrics that I couldn't write on, so that is a problem too.  For a couple of quilts, I put all of the information on the back of the binding before I folded it over, so it's there, but hidden.  Again, that works great until you have a fabric too dark to write on.
 Thanks in advance for your opinions!  I really do struggle over this issue every time I finish a quilt!

Saturday, June 12, 2010

Fresh Picked Apricots & Pet Pics

We got home from vacation just in time to start harvesting the apricots from our tree.  This is a young tree that is only in it's second growing season, so we are very pleased with the decent crop we have.  Now if we can only save the fruit from the birds, we'll be in good shape.  We put up netting before we left on vacation, but the birds are very persistent this year.  They have resorted to ripping holes in the netting to get in.  We had a previous apricot tree for years until the two current dogs killed it by ripping the limbs off, and the netting always worked to keep the birds out.

The first picture is the tree before any picking and the second picture is the first fruit we picked on Tuesday, minus the ones we ate while we were picking *grin*.  Even the ones that don't look completely ripe seem to have a really good flavor. 


Here's what is still left after the first picking:


I had to get back in the habit of snapping pet pics after we got back home, and I've gotten a few good ones this past week.  I've also had several requests for more pictures of the dogs, so I got a few good ones of them as well.  DH also got this picture of Koda and Echo a couple of days ago.


I got one of Echo on Wednesday in one of his unusual sleeping locations.  I could understand if he laid on the sewing machine tray or behind it, but half on and half off?  That just doesn't seem comfortable, but he slept there for quite awhile so it must have been suitable for him.  Tyrone has taken up residence lately in the spot behind the machine between the machine and the wall.  You can just see his head behind Echo.

Sassy was being her usual sassy self on Wednesday night while we watched TV.  We have had to remove the large vase that used to live on top of this entertainment center for fear that it would meet the same fate as the pot from the plant shelf.  She gets up there by jumping on the free standing speaker, but does it so quietly that you usually don't hear her.  She gets taken down multiple times and just waits for a few minutes and goes right back up. 

Here's her response to being caught up there:


And here's her response to being told to get down:

Typical Sassy response, although sometimes she also at least acknowledges you with a squeak.

Do you think she knows that we have no power over her and that she can get away with whatever she wants?  It seems to me that she does.

I got a few good pictures of the dogs early Thursday morning when I was checking on the apricot tree.  They are hard to photograph unless the light is just right outside since they are so dark.

Koda standing around watching me and Maya:


Must have gotten tired so he sat down in the same spot.  Of course, it is already 80 degrees out at 6 a.m., so who could blame him for wanting to rest.


Maya wandering back from checking the gate and visiting with Rocco, the dog next door who has something to say alllll day long.  I probably would too if I were left alone in a small section of the back yard for hours and hours and hours, whether my owner is home or not.  I feel so bad for the little guy.  It's hard to get mad at him for barking as he's just bored and wants someone to play with him.  I know that the owner knows he barks because many time the owner is home while he's doing it.  Or maybe his hearing isn't is good as ours???


Friday, June 11, 2010

Sweet Sixteen is Finished!

I had alot of fun making this quilt.  I basically designed it as I went and the starting point was a baggie full of 1 1/2 inch dark squares.  The full background for this quilt is in this post.

The finished quilt:


Quilting closeup in the blocks and border:


And the back:


For the quilting on this quilt, I used Essentials Violet in the dark squares areas and for the ditch quilting, YLI Vineyard in the border, YLI Fireweed in the light areas of the top, and Robinson Anton 50 wt cotton in Sterling in the bobbin.