Showing posts with label Tutorials. Show all posts

Wednesday, March 15, 2017

2 Hour Table Runner Finish, a New Iron & a Cutting Mat Bath!

I have gotten way behind in my bindings as I've gotten absorbed in my Perkiomen Daydreams blocks and now I have a huge backlog of quilts needing binding. So, to remedy that situation I have decided to go back to only doing hand work while listening to Daily Audio Bible. I have mostly followed that plan and finally finished sewing down the binding on this two hour table runner last week that has been quilted and half sewn down for months.


This version of the runner is sold out in the shop, but we still have black and red versions, blue and tan and a bright reindeer version available.  You can find them all HERE.


I also made progress on the next binding in the queue and should get this little quilt finished this week.


My cutting mats finally got a bath this past week as well!  It was long overdue.  Too long as it turned out as some of the deepest cuts were just too far gone to heal.  Both of the mats that I washed were 10-15 years old and it was becoming very difficult to cut on them and my rotary blades were becoming dull very quickly.  While the worst parts of both mats didn't really get better, both are reversible and the other sides are in excellent shape, as are the outer parts of the bad sides, so they are still usable.  I will be starting this maintenance on my newer mats now to hopefully keep them in great shape for longer.  There are directions all over the Internet and how and why to do this, but these are the instructions I used today:  http://sew-fantastic.blogspot.com/2009/11/make-your-self-healing-mat-last-much.html


Out of the bath and drying:


Finally, it was an exciting week last week in that I got a new iron after at least 10 years of using the old one.  I would have been very happy to continue using the old one as I loved that iron, but it had started to randomly spew rusty water out.  Not good when you are pressing very light fabrics.  And my new ironing board cover has stains now as well :-(.  I am very careful to empty the water after each use and to only use distilled or purified water, but alas, after that much use, this was bound to happen eventually. I paid just over $20 for the iron brand new so I most definitely got my money's worth. And yes, it ...was made in China. Just like the replacement model I purchased. The new iron was still only $28 from Amazon with free shipping so if it lasts half as long as the previous version I will be thrilled, but I am hoping it lasts much longer. I love these Panasonic irons and I really love the retractable cord! They also get nice and hot and they heat up quickly. And they are fairly lightweight which is important to me.

And that sums up all of the exciting events in MY life last week :-).  Oh, and we also found a great like-new sectional for our formal living room, so that was fun too :-).  And of course the remodel work on the rest of the house continues to move along.  Last week involved finishing the painting in the living room.  This week it is back to baseboard cleaning and staining.


Monday, July 5, 2010

Crocheted Cat Mat Tutorial

I recently posted about the cat mat I made for Sammy with my cotton yarn scraps.  While hers was extra large size to fit her chair, I have made smaller cat mats for the Arizona Humane Society.  I thought it might be fun to do a tutorial for making these mats since they are made in the round to make them a double thickness.  This is a bit different than your average crochet project. 

All of the cat mats I make are crocheted with a size G hook.  The smaller mats take exactly 5 ounces of yarn, which is a standard Red Heart Yarn skein size.  I don't know how much yarn I used in Sammy's mat because it was made from scraps.  All of the directions in this tutorial will be for the smaller size mat.  If you want a larger mat, just increase the size of your starting chain, but realize that you will also need more yarn.  Please note, the tutorial instructions assume that you have a basic knowledge of crocheting.

Let's begin.

Step 1 - Chain (ch) 51

Step 2 - Single crochet (SC) in second ch from hook and in each ch across.  Your project may look like this and that's ok:


Step 3 - This step is tricky and where we establish the pattern of working in the round.  YOU ARE NOT GOING TO TURN YOUR WORK.  Instead, you are going to do your second row of SC in the bottom loops of the original chain.  You are also going to tuck in your beginning yarn tail at the same time.  You're going to have to stretch a bit to make the first stitch around the corner at the end.  Like this:


See how you are reaching through to get to the back loop?  Pull your yarn through and complete the SC.

Here's a picture of the second stitch in the back row.  See how I'm capturing my starting yarn tail with the stitch so that it gets buried?


After a number of additional stitches, the tail is pretty much buried and you can either clip off the remainder or leave it.  It will be tucked inside the mat and won't show so it doesn't matter which way you go.  Do whatever floats your boat.


  Continue across the row, making a SC in the back loop of all of the Row 1 SCs.  When you are done with the stitches on both sides of your original chain,  your piece should look like this:


Step 4 - This step is where the fun begins.  From here until we get to the end of our mat, we are just going to stitch around and around and around and ALL STITCHES FROM HERE ON OUT WILL BE IN THE BACK LOOPS ONLY.  There's only one trick to getting this process started correctly.  You want to make sure that you only make stitches in your previous stitches and not in the ends of the rows.  If you start putting stitches in the ends of the rows, the sides of your mat won't go straight and it will start to expand in size and take on a weird shape.  This isn't good.  It's going to look strange, but trust me, the first couple of stitches when you go "around the corner" and start the next row will be huge compare to the rest of the stitches.  That's ok!  It's what's necessary to get around the corner without adding stitches and the big stitches will all blend in at the end of the day. 

See how I'm not going into the opening at the end of the row, but pulling the yarn through the back loop of the stitch across from the one I'm in (i.e. the one that shares the same beginning chain space as the one I'm currently in)?


As you continue to add stitches in Row 3, your piece will begin to curl up on the end.  That's ok.  It's supposed to do that.


The curl will probably be pointing towards you, but we actually want it going the other way, towards the inside of the mat.  Just flip it back so it looks like the picture below and continue on your way across the row.


Step 5 - Continue to crochet round and round making sure you don't add stitches to the end.  That should be easy to avoid after the first few rows, provided you didn't add any stitches in those rows.  If you did those correctly, you will just keep putting stitches in the previous row's stitches.  After a few times around, your piece should be looking like this:


After even more rounds are done, you should have a pouch starting to form:


If you've used scraps of yarn and tied them together like I did for Sammy's mat and the mat above, you can see how you can put the knots on the inside of your stitching to keep them hidden inside the mat.  It will eventually be stitched shut (more on that later), so you will never see the knots once you are done.  Here's what your "pouch" looks like from one side if you lay it flat:


Step 6 - Continue to crochet round and round until you get the size mat you want or you run out of yarn, whichever comes first.  Just kidding.  Obviously if you run out of yarn and your mat isn't big enough yet, you will have to get more yarn!  When your mat reaches the size you want, DON'T CUT YOUR YARN.  Before you cut your yarn, we need to measure how much we need to complete the final assembly of the mat.

Your last stitch should be one stitch before the end of the row, as shown in this picture.  In case you didn't notice, the "mat model" has just switched to Sammy's mat.  That's because I didn't take pictures of the starting process when I made her mat, so I had to start another one for the first part of the tutorial.  Her's wasn't the correct size for the tutorial anyway, but it works for the finishing steps.


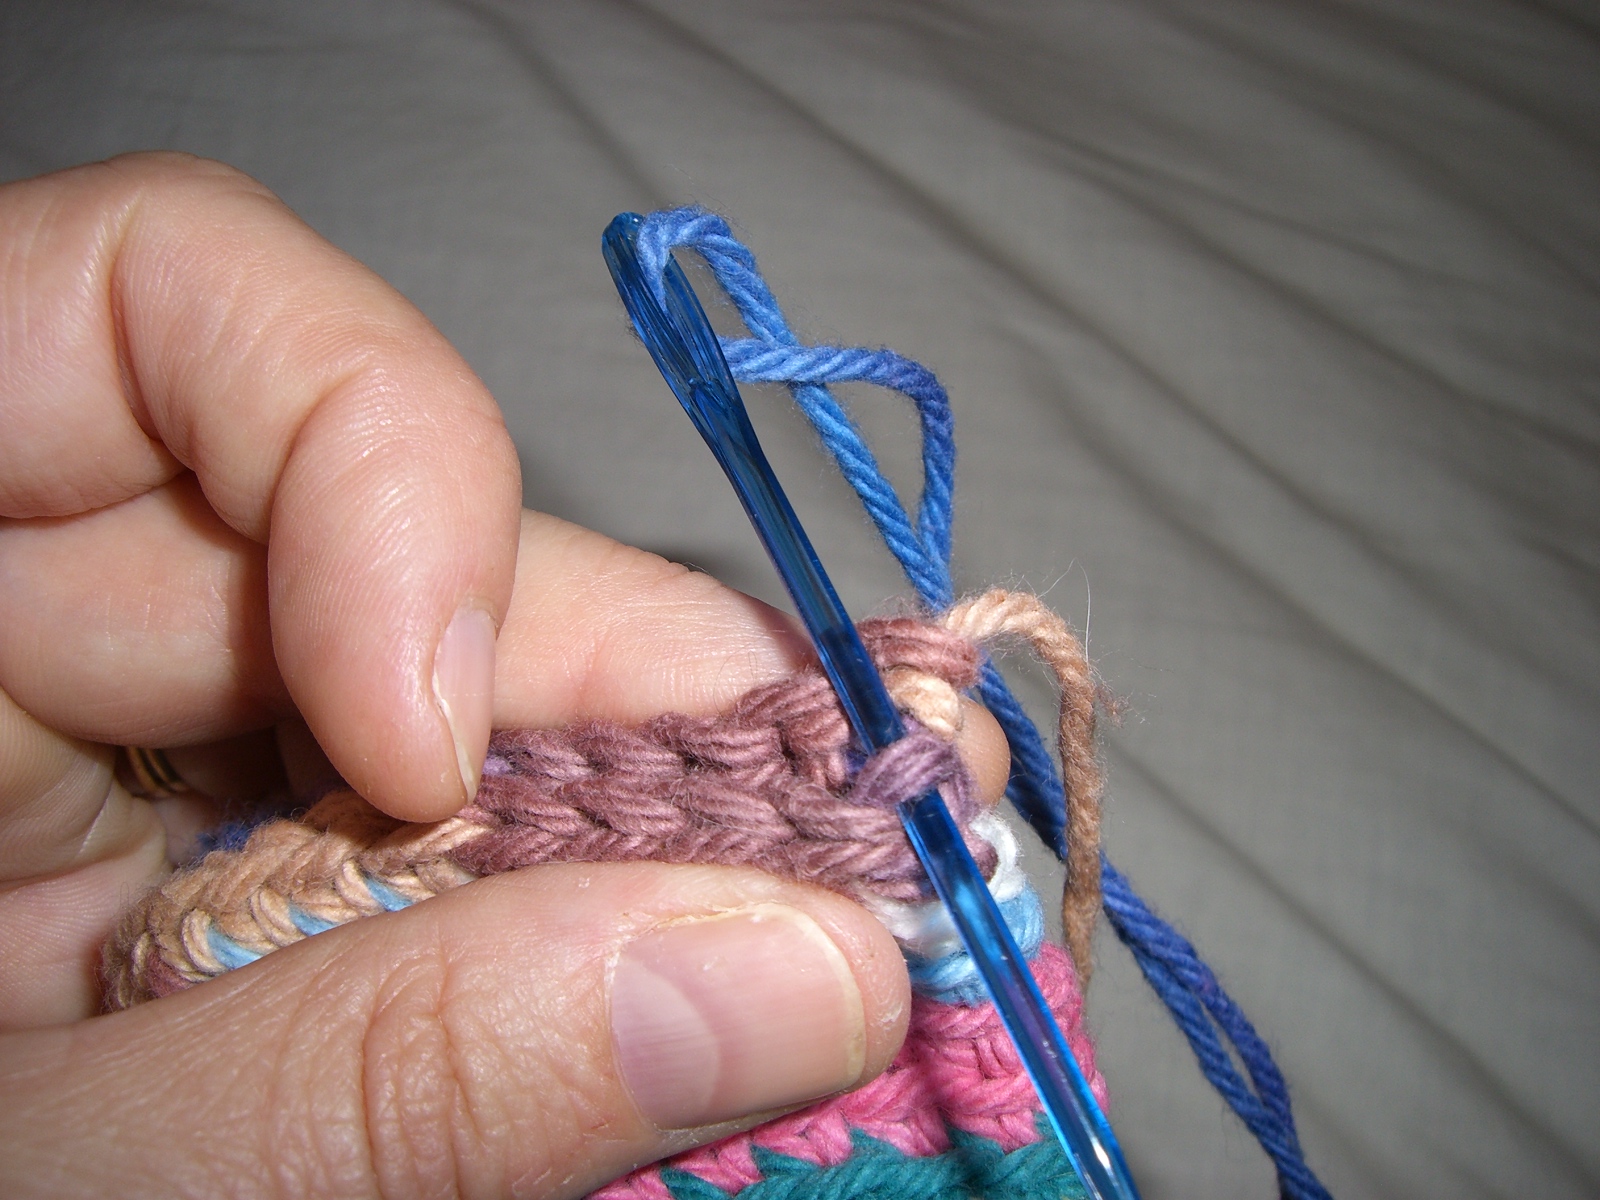
Step 7 - The Finishing - In addition to your mat, you will also need a Yarn Needle or large Tapestry Needle.  I use a plastic yarn needle purchased at Hobby Lobby that looks like this. 


To determine the length of yarn you need for finishing, I lay the yarn loosely back and forth three times across the width of the mat and cut the yarn at the end of the third pass.


Pull the yarn through your ending loop like this:


We're not going to sew the mat together.  The first stitch will come over the top of the mat opening to the loop on the opposite side as where you put your final stitch.


We're going to sew across the mat with a weaving stitch.  The next pictures show how the first couple of stitches will be made.


Last stitch of the first weaving pass.  See the red stitches and how they alternate on each side?


For the second weaving pass, your stitches will go in the opposite spaces as the first pass.  The first picture shows how you will turn the corner to begin the second pass.


Starting the second weaving pass:


Second pass after a number of stitches:


When you finish the second pass weave the yarn back into the mat interior and back out a number of stitches in the opposite direction and clip.  A slight tug will pull the raw end into the mat interior to hide it.

Good job!  You're done.  If you started with a 51 stitch chain, your finished mat should look something like this:

Or this:


Thursday, July 1, 2010

Crocheted Dishcloth Tutorial

This dishcloth pattern is crocheted with a size F hook.  My cloths use about 1.3 ounces of yarn.  Yours may use more or less depending on how your tension compares to mine.  I used 100% cotton yarn, either Sugar 'n Cream that you can purchase at Joann's, Michael's, Hobby Lobby, etc. or Peaches & Creme that you can purchase at Walmart or directly from the company off their website.  You can also find both kinds of yarn on Ebay.

Please note, the instructions in this tutorial assume that you already have a basic knowledge of crocheting.

Step 1 - Chain (ch) 35.  Note, once you get the hang of the pattern, you can adjust to any size you want as long as you always start with an odd number chain.  For the purposes of this tutorial, all of the remaining steps are based on a Ch 35 start.


Step 2 - Insert hook in third ch from hook (top loop) and make a single crochet (SC). Ch 1, skip next ch and SC in the next ch. Repeat across. You should have 17 SC in the row and the last stitch should be a SC. This will be true for every row, so an easy check will be to count the SCs after you've finished the rows and to make sure that you not only have 17 but that your last stitch is a SC. If not, you've dropped or added a stitch somewhere along the way and you will need to rip out and fix that row.

Taking a stitch in the top loop:


The first few stitches of the first row:


Step 3 - Ch 2 to turn at the end of each row


Step 4 - Row 2 - Insert your hook from front to back through the space created by the Ch 1 in the previous row. Pull the yarn from back to front, under the ch 1. You should now have a loop on your hook from which to create the SC in that space. Complete the stitch. Ch 1 (over the SC in the row below), SC in the next ch 1 space. Repeat across. The last SC in this row is tricky because you have to make it in the space where you left the initial 2 chains at the beginning of the row. Just work your hook in there, front to back, and pull the yarn up like you did for the other SC's. After this row, you will have a ch 1 space to work the last stitch in and it won't be any different than the other SC's in the row.

Inserting the hook for the first stitch and pulling the yarn through:


Finished first stitch:


Tricky stitch at the end of Row 2:


Step 5 - repeat steps 3 & 4 until you have 32 rows total. Finish off or add edging and then finish. I would recommend leaving the edging off for your first few until you get comfortable and are getting nice square cloths. I found some of my initial edging distorted the cloths until I figured out the best number of stitches to use on each side to keep it in square.
 
The start of Row 3 and every subsequent row:
 

This is what your finished dishcloth should look like with no edging:


I hope you enjoyed this tutorial!  Please leave any questions in the comments or email me.  I set this tutorial to post while I am out of town and don't have access to the internet or my email, but I will respond to any questions as soon as possible once I am back in town.

Wednesday, June 30, 2010

Lumpless Binding Tutorial - No Rulers or Pencils Needed!

I mentioned while we were in Texas that I finally figured out a lumpless binding method that worked for me that didn't involve rulers or drawing lines.  I thought I would share it with all of you in case anyone else was lumpless binding challenged like I was.

Step 1 - Make your binding as you normally would.  For this method, it doesn't matter your starting strip width.  My binding strips are either cut 2 inches for my small quilts or 2 1/4 inches for my large quilts.  I sew the 2 inch bindings on with a quarter inch seam allowance and the 2 1/4 inch bindings are sewn on with a 3/8 inch seam allowance. 

Step 2 - Begin sewing your binding on about 8-10 inches from the starting point (i.e. leave a long tail to start).

Step 3 - Attach the binding as you normally would, but stop approximately 8-10 inches from the end of your starting strip (i.e. this leaves you with an 8-10 inch tail at the beginning and end of your binding at this point).

Step 4 - Take your quilt to the ironing board and press the end of your beginning binding tail at a 45 degree angle, like this (i.e. towards you).  Ignore the partial piece of fabric you see in the upper right.  We'll get to that later.  I couldn't crop it out of the picture and still leave the part I wanted to show.


Step 5 - Take your tail from the beginning of the binding and lay it flat on the quilt as it would be if it were sewn down.  Don't stretch or pull.  Just lay it nice and flat and pin it in place.


Step 6 - Take your other tail and lay it flat on the quilt the same as you did for the beginning tail, including laying it on top of the beginning tail that is pinned down.  Then, fold back the ending binding tail onto itself with the fold falling even with where the folded fabric in the previous picture ends on the beginning tail (i.e. where the right side of the long triangle edge meets the wrong side of the binding fabric).  It might help to unfold the first strip so you can see that you have the ends matched up.  I should have taken a picture like that instead of the second picture below, but hopefully you can figure out what I'm saying.  What looks like a seam in the second picture is actually the fold over line from the beginning tail.  THIS IS THE MOST IMPORTANT STEP SO YOU NEED TO MAKE SURE YOU'VE GOT THE FABRICS LINED UP AS INDICATED.


Step 7 - Once you are satisfied that you have the fold in the right place, pick up your scissors and cut the fabric as straight as you can on the fold.

Step 8 - Press the ending tail at a 45 degree angle like you did for the beginning, but the ending tail will be pressed away from you.  Unpin the beginning tail and your binding ends should look like this.  When you spread the two pieces out the folds should touch each other and it should look like one piece of fabric, but I wanted to separate them for photo purposes.


Step 9 - Pick up your binding ends with right sides together and all edges and the folds matching up.  Don't twist either piece, just unfold each end so you have right sides together.  Put another way, think of it like you are picking both ends up with one hand and pinching them together at the fold line with right sides of fabric together.  Pin securely and take your quilt to your sewing machine.  If this is sounding a bit familiar at this point, it's because this is probably how you attach binding strips together when you are piecing your binding in the first place, except maybe you draw your sewing line, or cut your strips off at a 45 degree angle like I do.  The only major difference is that you now have the added challenge of wrestling with your quilt while you sew this final seam.


Step 10 - Sew the ends together using the fold line as your sewing line.  Unpin, trim your seam allowance to 1/4 inch and press the seam open.

Step 11 - Re-press your binding if necessary and finish attaching to your quilt.  Wa La, you have now completed a lumpless binding finish.  Doesn't it look great?


Please ignore the double seam lines.  I forgot to adjust my needle position after sewing the ends together.  Since I needed a wider allowance I just sewed another seam and left the other one in place rather than ripping it out.

I hope these instructions make sense.  If not, please leave any questions in a comment or send me an email.  I scheduled this to post while I was gone on vacation with no internet access, so I won't be able to answer questions immediately, but I will respond as quickly as I can once I return.