Step 1 - Make your binding as you normally would. For this method, it doesn't matter your starting strip width. My binding strips are either cut 2 inches for my small quilts or 2 1/4 inches for my large quilts. I sew the 2 inch bindings on with a quarter inch seam allowance and the 2 1/4 inch bindings are sewn on with a 3/8 inch seam allowance.
Step 2 - Begin sewing your binding on about 8-10 inches from the starting point (i.e. leave a long tail to start).
Step 3 - Attach the binding as you normally would, but stop approximately 8-10 inches from the end of your starting strip (i.e. this leaves you with an 8-10 inch tail at the beginning and end of your binding at this point).
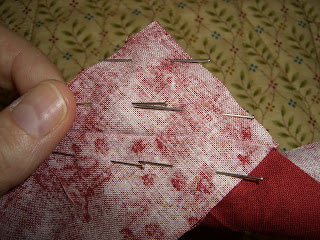
Step 4 - Take your quilt to the ironing board and press the end of your beginning binding tail at a 45 degree angle, like this (i.e. towards you). Ignore the partial piece of fabric you see in the upper right. We'll get to that later. I couldn't crop it out of the picture and still leave the part I wanted to show.
Step 5 - Take your tail from the beginning of the binding and lay it flat on the quilt as it would be if it were sewn down. Don't stretch or pull. Just lay it nice and flat and pin it in place.
Step 6 - Take your other tail and lay it flat on the quilt the same as you did for the beginning tail, including laying it on top of the beginning tail that is pinned down. Then, fold back the ending binding tail onto itself with the fold falling even with where the folded fabric in the previous picture ends on the beginning tail (i.e. where the right side of the long triangle edge meets the wrong side of the binding fabric). It might help to unfold the first strip so you can see that you have the ends matched up. I should have taken a picture like that instead of the second picture below, but hopefully you can figure out what I'm saying. What looks like a seam in the second picture is actually the fold over line from the beginning tail. THIS IS THE MOST IMPORTANT STEP SO YOU NEED TO MAKE SURE YOU'VE GOT THE FABRICS LINED UP AS INDICATED.
Step 7 - Once you are satisfied that you have the fold in the right place, pick up your scissors and cut the fabric as straight as you can on the fold.
Step 8 - Press the ending tail at a 45 degree angle like you did for the beginning, but the ending tail will be pressed away from you. Unpin the beginning tail and your binding ends should look like this. When you spread the two pieces out the folds should touch each other and it should look like one piece of fabric, but I wanted to separate them for photo purposes.
Step 9 - Pick up your binding ends with right sides together and all edges and the folds matching up. Don't twist either piece, just unfold each end so you have right sides together. Put another way, think of it like you are picking both ends up with one hand and pinching them together at the fold line with right sides of fabric together. Pin securely and take your quilt to your sewing machine. If this is sounding a bit familiar at this point, it's because this is probably how you attach binding strips together when you are piecing your binding in the first place, except maybe you draw your sewing line, or cut your strips off at a 45 degree angle like I do. The only major difference is that you now have the added challenge of wrestling with your quilt while you sew this final seam.
Step 10 - Sew the ends together using the fold line as your sewing line. Unpin, trim your seam allowance to 1/4 inch and press the seam open.
Step 11 - Re-press your binding if necessary and finish attaching to your quilt. Wa La, you have now completed a lumpless binding finish. Doesn't it look great?
Please ignore the double seam lines. I forgot to adjust my needle position after sewing the ends together. Since I needed a wider allowance I just sewed another seam and left the other one in place rather than ripping it out.
I hope these instructions make sense. If not, please leave any questions in a comment or send me an email. I scheduled this to post while I was gone on vacation with no internet access, so I won't be able to answer questions immediately, but I will respond as quickly as I can once I return.


.JPG)


1 comment:
Great tutorial! I do mine much the same way except I use a 2 1/2" width and a 3/8" seam. It's probably too wide but I always want fudge room, I guess.
Beautiful fabric in your pics :-)
Post a Comment