Showing posts with label Large Quilts. Show all posts

Tuesday, April 11, 2017

A Couple of Finishes!

Wow, it has been almost a month since I've written a post.  I knew I was going to likely skip the week that I was preparing for a retreat; however, I was not prepared to come home from the retreat with a horrible cold that lasted for over two weeks.  I am not one that normally gets chest colds or coughing with my colds, but I sure did this time.  The cough is finally about 95% gone and my nose has stopped running 24/7.

I finished sewing the binding down on an old UFO just prior to the retreat.  I originally pieced this little quilt in 2010 while living in AZ.  I was starting my first machine applique project, so I wanted to do some practicing with my machine and the stitches before I worked on the "real" quilt.  I had some scraps of batiks laying around that already had fusible on them from making a Snippet Sensations quilt so I fused them on a piece of background fabric in a random pattern, practiced my machine applique skills around each piece, added a border and dubbed the finished quilt top "Collage Applique".  Just now as I was typing that I realized that "Applique Collage" is probably a more accurate name, but the label is already made (shocking for me) and I am not changing the name now :-).  I got the center half quilted while still in AZ, probably also in 2010 and then the quilt just sat and sat.  I finally pulled it back out, finished the quilting and got it bound.  It has now lived in 3 different states and I've had two different names since it got started, so it was time to get it done.  Here is the finished quilt.  Now I just need to find the perfect place to hang it :-)


I also got my Tumbling Nine Patch quilt completed at the retreat.  This quilt is a shop sample and only baby size, so since it will likely be either donated for a baby or gifted for a baby, I opted to attach the binding by machine to get it done and off the to do list.  There are a number of methods used to attach binding by machine.  I didn't want a lot of fuss and worry about having to line things up so I opted to attach the binding to the back of the quilt, pull it to the front and to stitch it down using a blanket/buttonhole stitch.  I am very happy with how the front looks.  Does the back look great?  Well, not so much, but I used a thread that matched the backing so unless you are looking close, it doesn't look bad.  And again, this quilt will eventually be used by a baby and will get washed and washed, so machine binding was a good choice for this quilt.  Below are pictures of the finished quilt and a closeup of both the front and the back of the binding.  I do have 3 kits of this quilt made up in the shop.  You can find them HERE.


I have also been plugging away on my Perkiomen Daydreams blocks and have 6 rows completely assembled.  Well, technically I have a block flipped on the far left side of row 6.  I have unpicked the stitching since taking this pic, but still have to sew it back together.


Tuesday, March 7, 2017

Fun with Leftovers!

I am still plugging away on my Perkiomen Daydreams blocks.  I have enough blocks completed for 7 full rows and 2/3 of an 8th row.  Just a couple more rows and I will be at the half way point.  By assembling rows as a go it breaks up the process, which is nice, and it also means that I won't have to lay out 400 blocks all at once.  Here is a pic of the first 6 rows with rows 1 & 2 joined and rows 3 & 4 joined.  I replaced and re-arranged the blocks in row 5 after getting row 7 completed in order to better disperse fabrics and colors.


Making all of these blocks generates a lot of leftovers, some of which are totally usable in my book, while others go in a bag for my quilting friend who makes art quilts.  I have two types of leftovers from these blocks - strings of a certain length and shorter pieced units that come from cutting the block segments.  I am piecing string blocks with the strings and coasters with the other leftovers.  The plan right now is to make the string blocks into potholders rather than put together in a quilt.  My latest idea is to piece the strings diagonally and use those blocks in a quilt.  Otherwise I will end up with about 50 potholders by the time I am done with this quilt :-).

Before I post the leftover pics, here is a pic with a bunch of block components spread out as I select which one to add to each block.  I try not to duplicate an individual fabric within a block, but it's happened a few times in spite of my efforts.


And here are the leftovers and what I am doing with them.


Wednesday, February 22, 2017

The Stripology Squared Ruler Rocks!

I am a scrap quilter.  That has already been well established.  As such, I'm generally not easily persuaded to buy specialty rulers for cutting this, that and the other, unless I can clearly see a benefit to doing so.  Part of it is not wanting to add more clutter to my sewing room when I don't use said specialty ruler as has happened in the past, nor do I want to waste money on something I don't use when said money could be used to buy fabric :-).  So it takes A LOT to get me to purchase a new type of ruler other than my tried and true Omnigrids that I have in various sizes.  I have considered getting a die cutter, briefly, at various points in my quilting career, to make cutting my scraps down to usable sizes faster and easier.  I have never been able to justify the cost or the space required, so thus far I have continued cutting down my scraps the old fashioned way (i.e. with whichever Omnigrid ruler worked best. Enter the Stripology Squared Ruler.  This ruler is the successor to the original Stripology Ruler.  I was able to resist the original ruler based on my quilting friends' reviews that it wasn't long enough for cutting longer pieces of fabric.  That problem has been solved with the Stripology Squared Ruler.  I was still on the fence about it until Gudren Erla, the designer of the ruler, sent one to Bonnie Hunter of Quiltville for her birthday.  Bonnie is a scrap quilter extraordinaire and when she used her ruler to cut down her scraps into strips for the quilt she was working on, I was sold.

My ruler arrived last week and while there were instructions included noting all of the different things you could do with the ruler, my focus was on cutting down my scraps and cutting my strips for my Perkiomen Daydreams quilt in progress so I just dove in without reading them lol.  I had quite a pile of my own scraps and gifted scraps to be dealt with so I started with those.  I'm trying to turn over a new leaf and deal with scraps as they come rather than storing them in boxes of  "Scraps to be Cut Down", of which there are currently 3 or 4 crammed full.  Oy.  No need to add to THAT backlog, so off I go with my new ruler.  While I couldn't use the ruler for all of the scraps to be cut down, boy did it make short work of the pieces to be cut into strips.  So far, so good. 

Scraps before pressing:


Pressed and ready to be cut into useful shapes, or kept as is (i.e. I keep a box of just triangles that work great for the corners of string blocks or for paper piecing triangle shapes as well as boxes of "crumbs" for paper piecing or crumb blocks).


Trimmed scraps.  The ruler is designed with markings for easy cutting of 1 1/2 and 2 1/2 inch strips, but you can cut pretty much any width strip you need as the ruler has cutting openings every half inch.  You just have to make sure that you count correctly :-).


Next I put the ruler to work cutting more of the bazillion strips that I need for Perkiomen Daydreams.  I want as much variety as possible and I want this quilt to be a scrapbook of fabrics I carried in the shop, so that involves lots and lots of strip cutting of lots and lots of different fabrics.  I stack the fabrics three at a time with pieces that are approximately the same width and I put the widest at the bottom and the narrowest on the top.  Clean up one edge, cut as many strips as you can from the stack and wa la, beautifully cut strips in a fraction of the time.


The biggest bonus so far having purchased this ruler is using it to subcut all of the strip sets I need for Perkiomen Daydreams.  Due to the long length of the ruler, I can easily cut two sets at a time.  This has saved me SO much time!  I will definitely pull out my Stripology Squared Ruler anytime I need to do a major amount of subcutting of strips or strip sets.


So in conclusion, this ruler is a bit spendy compared to other rulers out there, but the quality is great, it's made by Creative Grids so it has grippers automatically built in to avoid slippage, and it's a huge time saver.  The time saving aspect alone makes the cost of the ruler worth as it will pay for itself many times over since as quilters we all know that there are more quilts to make than time in the day LOL.  The larger shape makes it a challenge for shipping, but if I can figure out a way to efficiently ship the rulers, I will definitely stock them in the shop.

And here is the progress on Perkiomen Daydreams since my last post.  The blocks for rows 4 and 5 are completed, but I want to make at least one more row and then shuffle the blocks around to mix up the fabrics a bit more.


Monday, January 23, 2017

Finished Current Projects & Progress on an old UFO

I have made sure to spend time in my sewing room every day since getting home from the retreat and I have finishes to show for it!  Actually one of the finishes came in the truck on a road trip to pick up the 1000 square feet of flooring that we purchased, but a finish is a finish no matter where it happens!

I was on a roll with the Dancing 9 Patch top, so I kept going and not only got the top finished, but I also have the backing made.  I have a huge pile of unquilted tops, so one of my goals this year is to try and quilt each top as it's finished.  Sometimes quilts need to sit for awhile before quilting to figure out what will look best or just because you are so sick of the top by then that you can't stand to look at it for one more second LOL.  I'm still excited about the Dancing 9 Patch top, so I want to strike while the iron is hot.  I have plenty of batting on hand, so I just need to get that cut and the quilt basted so I can start the quilting.

Here is the finished top followed by the quilting design that I have decided on.  It really is true that if you practice a design over and over by drawing it on paper, that WILL translate to quilting your quilt.  I did the same thing when I was trying to learn an allover swirl quilting design and now I'm trying it with another design.  I've seen this one referred to as headbands and mussels and I'm sure there are plenty of other names for it as well.  I get huge pieces of packing paper in with my fabric shipments and I realized last week that they would be perfect for practicing doodling allover quilting designs.


The finish I mentioned came in the form of sewing down the binding on this small quilt that I pieced in 2015 and quilted last year.  It was one of them that got the swirl quilting.  It's a disappearing 9 patch pattern.  I got the entire binding sewn down in about 2 hours of our 3 hours of road time going to and from Fargo for our flooring.  I was shocked at how fast it went and realized that quilts with batik binding seem to take me much longer to sew down as the tighter weave makes it more difficult to push the needle through, even with the use of a thimble.   But I will still use my beloved batiks :-).


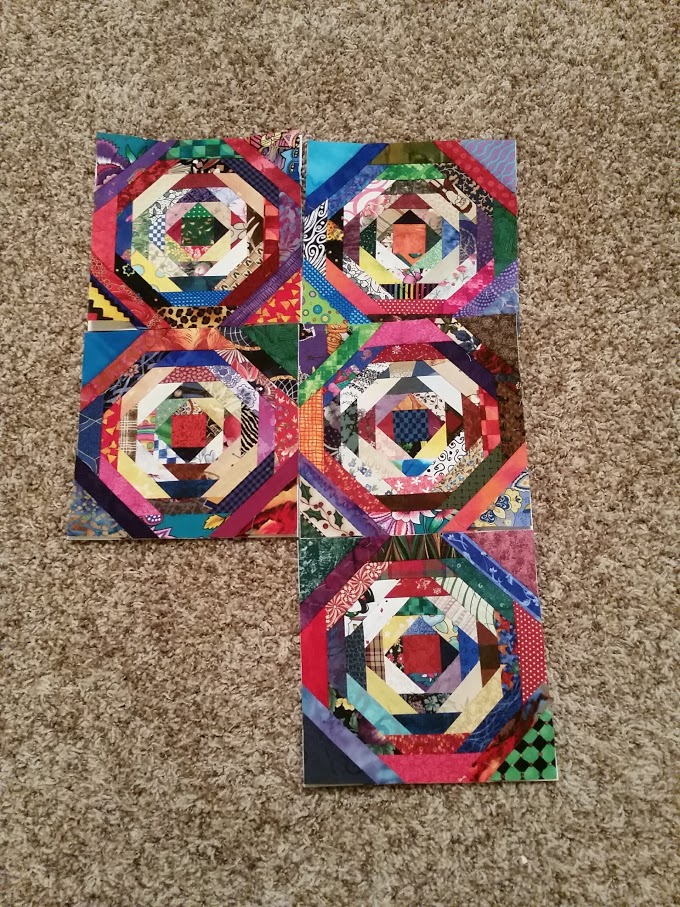
I have also been slogging along with updating my UFO lists and creating a detailed list in a notebook with all of the steps/materials needed to complete the project.  One of the quilts in progress was a pineapple quilt.  It's hard to really call it a quilt in progress when all it consisted of was 6 pineapple quilt blocks barely started.  I do still have a large pineapple quilt on my "must make" list, but in the spirit of getting something done with these barely started blocks right now, I decided to finish them all and make a small table runner out of them.  I got 5 of the 6 done before I called it quits last night.  Digging through bags of scraps for just the right pieces was so. much. fun.  Now I actually do want to start a large pineapple quilt lol.  But I will wait on that until I put a bigger dent in that pile of quilt tops to be quilted as well as other UFOs.  Pictured below are a couple of blocks in progress, the five finished blocks and my piles of scraps.


Finally, on a quick note about quilt shop business, it's the time of the month that our latest Fabric Club selections are posted.  We currently have three clubs - a Fat Quarter Club, a One Third Yard Club and starting this month, a Half Yard Club.  In each case, you get six coordinated batik fabrics in the cut size applicable to the club you are in.  This month we have grays and turquoises and the fabric selections are below.  


Sunday, July 7, 2013

Christmas in July!

I am continuing to plug along on old UFOs.  The boys are all at my in-laws farm this weekend doing some work for them so I have taken advantage of my time alone and have spent a lot of time in the quilting studio.  I have been itching to do some machine quilting as it's been well over a year since I've done any, so I dug out this Christmas 9 Patch quilt that was ready to go and got it all basted. 

I just wound a bunch of bobbins and will be getting started on the quilting shortly.  I'm going to do an overall grid pattern on it.  As an extra bonus, when I unfolded it I found that I had already made the binding for it, so I can get that attached as soon as the quilting is done.  Who knows, it might actually get done by Christmas!!!

Saturday, March 2, 2013

Perkiomen Daydreams

Ever since I saw this quilt on Bonnie Hunter's website I knew that I had to make it someday.   Well that someday has finally arrived.  I got the book with the pattern in it for Christmas this year and realized it would be a perfect quilt for using the cutoffs I get from prepping the bolts for sale in my store.  So out with the original plan for the cutoffs and in with the new. 

This quilt is HUGE and has 10,000 one inch squares.  Even using strip piecing methods, that is ALOT of cutting, sewing, and then more cutting.  I set a goal to cut and piece 50 strip sets in February to ultimately yield 50 blocks (I think) of the 400 total that I need.  I managed to get 3 sets completely pieced and the fourth cut, but now sewn.  Not bad considering the time of year it is.

Here are some pics of my progress in February:


Wednesday, January 23, 2013

Chocolate Covered Cherries is Done!

Woo hoo!  I have a completely finished quilt and the first month of 2013 isn't even done yet!  Of course, it was already to the stage of having the binding partially sewn down at the end of 2012, but hey, a finish is a finish and there has been a long, long drought around here with regard to finished quilts.  I believe the last one was in, ahem, 2011.  Ouch.  But I did have a few big things going on since then so I will cut myself a bit of slack.

Anyway, here is Chocolate Covered Cherries, all washed and ready for snuggling under.  I didn't feel like vacuuming up the cat hair to take a picture upstairs where it is marginally brighter than my basement studio (North Dakota in the winter you know) so please excuse the bad lighting in the picture.  The fabrics are batiks, my favorite, in a beautiful fuchsia combined with the brown and pink print.  The block is the bento box block.


Thursday, December 8, 2011

Scott's Quilt is Done!

Scott's quilt is done and awaiting only the label, so well ahead of schedule for Christmas.  My quilter did a great job with the quilting and I am thrilled with how it turned out.


Before our weather suddenly turned cold, we had a few days that were in the high 70's/low 80's.  The felines spent some time at the open front door enjoying that weather.


Friday, September 16, 2011

Hot Off The Sewing Machine!

Lest you think I have been sitting around eating bon bons since my last post on, ahem, August 19th, I assure you that is not the case.  I have actually been sewing!  Yes, it's true lol.  And I took lots of pictures during the process that I intended to post, but obviously that didn't happen.  But I am posting the finished quilt top, so surely that should count for something. 

This quilt is S's Christmas present, and he knows about it, so no worries about spoiling the surprise.  In fact, I was furiously sewing blocks into rows and then rows together when he was here last weekend.  Last night I attached the borders and here is the finished top, which apparently meets Sassy's approval lol.


The pattern is Radio Flyer by Carrie Nelson and the fabrics are a mix of the Moda Java and Bistro lines by Deb Strain combined with creams and tans from my stash.  More backing fabric is on the way, after I realized I didn't have enough, so next up is piecing the backing when that gets here so I can get the quilt to my longarm quilter by October 6th and the bound and finished by Christmas!

In addition to working on this quilt and preparing tax returns for the tax deadline that was yesterday, did I mention that S and I bought a house while I was in ND in July and that it closed escrow on the 8th of this month?  No kidding.  So we've had a bit going on with that and now that he has taken possession this week, next up are flooring changes and painting.  Lots and lots of painting.  I will be heading up there to help in the near future and on my to do's for today is a trip to Lumber Liquidators to look at the laminate in person that we picked out together online last night.  If it's a go, then he will get it ordered so it is ready for us to install during my October trip. 

This weekend is the big move for him so he can get his house on the market ASAP.  My big move will come early next summer.  Since our real estate market is so poor down here, we figure the best move is to rent my house for now.  Anyone looking to rent in Phoenix starting next summer?

So that is what has been going on in my neck of the woods.  Oh, and killing scorpions.  I'm getting kind of sick of that, but hopefully scorpion season will be over soon.  I will spare you the pictures of those.  Suffice it to say that in the last week I have not only seen the smallest scorpion I have ever seen in my house, but also the largest.  Yuck.  And I have a new pet.  Stuart.  As in Stuart Little.  Yes, it is a mouse.  He lives in my garage and I did buy a trap with which to humanely kill and dispose of him, but then I read online that mice eat scorpions.  He seems to be a bachelor mouse, so as long as that is the case, he gets to stay, provided he eats the scorpions, which I think he does since the dead ones I leave in the garage seem to disappear by morning.  That seems like a win/win to me.

Sunday, October 31, 2010

Strings from Stash is Done!!

I put the last stitches in the binding of Strings from Stash on Friday night.  Woo hoo!  I love, love, love this quilt.  It was so much fun to make from start to finish.  The story of this quilt is this post and this post.  The second post also includes a tutorial on how to make string blocks if anyone is interested in making a quilt like this themselves.  It's really quite easy.

Here is the finished quilt:


And here's the back:


So far this weekend I have been like a quilter possessed working on Indian Summer.  I made the backing yesterday morning, got the quilt layered and basted and I am half done with the quilting.  I'm hoping to finish up the quilting today.

Oh, and as a side note, Echo has received no less then 2 more baths from Maya since I posted about the first one on Thursday.  He seems to like it, so whatever floats his boat I guess LOL.

Thursday, May 20, 2010

Long Tall quilt is DONE!

I put the last stitches in my Long Tall quilt last night while watching The Good Wife.  Is that a great show or what?  DH and I both love it.

But I digress.  My quilt was made from this pattern.  It was a monthly strip club offering at a local shop.  Rather than use the jelly roll they offered, I used turquoise and purple batik strips from my 2 1/2 inch batik strip bin.  The background is a Hoffman 1895 batik - color Hyacinth and the border is Hoffman 1895 Agate.


Here's the back:


Check these out.  These are the two color catchers that I threw in just for extra insurance when I washed the quilt this afternoon.  Every fabric in this quilt was prewashed with Retaine and I washed the finished quilt in cold water with a cold rinse.  And I still got this:


I can't imagine what they would have looked like if I hadn't prewashed.  YIKES.  I know batiks have excess dye, but you would think that after prewashing, as well as rinsing, nothing should be left.  The interesting thing is that I always check the water when I prewash to make sure that it's clear before I dry and use the fabrics so I thought I was safe.  As long as I use Retaine, it always seems to be clear, so I'm not sure where all of the extra purple came from during this wash cycle.  Oh well.  Thank goodness for the color catchers.

On an unrelated note, do you see anything wrong with this picture?


One of Sassy's other new tricks is to jump onto the top of that big pot next to the baker's rack.  She does it so quietly that we don't know she's there until she starts messing with the sticks that are in the pot.  She's already broken one.  Sigh.  That pot is about 4 feet high and at least 10 years old and we've never had to worry about it until now.

But, she gets away with pretty much everything because many other times she looks like this and is so cute and entertaining.


I thought this little scene was interesting as well.  Echo apparently decided to do one of his snuggle fests with Sassy and ended up laying right on top of her.  What you can see from top to bottom is Echo's head, one of Echo's front legs, then one of Sassy's back legs, Echo's other front leg, Sassy's other back leg, Sassy's tail, and then finally one of Echo's back legs.  I thought it was pretty funny how they alternated.  While they were laying there, Echo was very nicely washing Sassy's feet and tail for her.  I did check to ensure she was breathing since he does weigh more than double what she does.


Sunday, February 14, 2010

Scrap Club Floral Quilt Done!

Today I put the last stitches in the binding of the comfort quilt I am sending to my aunt.  I call it the Scrap Club Floral Quilt because it came about from a Scrap Club I was in through a quilt shop in 2003.  It is a very old UFO, so I'm happy to have it done for many reasons.  Here's the finished quilt pre-washing.


And here's the back.  You can see why this quilt needed reversable binding.  The front binding would have looked horrible on the back.  I pieced the back using 10 1/2 squares ala Bonnie Hunter.  I completely used up all of the fabrics except for scraps.  I also took a close-up picture of the back.


Finally, here's a couple of pictures of the reversable binding.


The binding was an interesting technique to learn.  I would use it again if necessary, but wouldn't consider making it my normal binding method as it takes a lot more time to make the binding and I didn't get as snug of a fit as I normally prefer since the seam had to line up on the edge of the quilt.  One bonus is the fact that the front color takes a much narrower strip than normal, so in the case of this quilt, I was able to match the binding to the inner border.  I only had some strips left of that fabric and they were too narrow to cut enough of my normal 2 or 2 1/4 inch binding strips, but there was plenty for the 1 1/8 inch strips needed for this method.

All in all, I'm pleased with the finished quilt.  It is all nice and soft and crinkly after washing.  I hope my aunt likes it.  She doesn't know it's coming, so I'm sure she will be confused by the large box that arrives.  I also found the perfect card today to send with it.

On a humerous note, since it is Valentine's Day, I got up to a lovely card from my DH.  As I began to read the verse on the front, certain parts were sounding eerily familiar.  Yep, you guessed it, he bought the identical card last year, and it was 25 cents cheaper to boot :-).  It's a great card so I can see why he bought it again.  He was mortified when I showed him the two cards, but it really doesn't bother me at all.