We have spent the last 3 weekends traveling so I needed to have a good traveling project to work on in the car. I only had one small quilt to bind and I wasn't in binding mode anyway, so I chose to bring the scrappy afghan I am crocheting. Two of the trips were 5 hours each way so I was able to make quite a bit of progress when I didn't have a cat in my lap. Sassy traveled with us for the first two trips so I didn't get as much done on those.
Here is my progress so far and a close-up of the variety of colors I am using. Because of all of the color changes I have lots of yarn ends to weave in, which I don't care for at all, but it's worth it to get this awesome rainbow of color. I am using my cotton yarn stash, much of which is no longer available since Peaches 'n Creme sold out to the Sugar 'n Cream guys, so having all of those discontinued colors in one afghan is pretty cool in my opinion.
As an extra bonus, I stumbled across a cute little quilt shop in Jamestown, ND this past weekend purely by accident as we were leaving the buffalo museum of all places. We had 30 minutes until closing so perfect for a quick browse through the shop and to pick up a few small pieces to add to my stash.
Showing posts with label Crochet. Show all posts
Tuesday, June 4, 2013
Tuesday, November 6, 2012
Getting There...
I've made good progress on my dishcloth afghan, which I think will be renamed "Patchwork Afghan" since it has a quilt-like look to it.
I've got the bottom three rows sewn together and the blocks are sewn together for all but the last two rows. The assembly is going really fast and is an excellent tv watching project. Then it will be on to the border and it will be done!
Of course Sassy had to get into the picture. She says she hasn't been on the blog much lately and that needs to change! lol
I've got the bottom three rows sewn together and the blocks are sewn together for all but the last two rows. The assembly is going really fast and is an excellent tv watching project. Then it will be on to the border and it will be done!
Of course Sassy had to get into the picture. She says she hasn't been on the blog much lately and that needs to change! lol
Friday, October 19, 2012
My Latest Project
I have been in crochet mode lately, which is good since I seem to be spending a lot of time watching football these days and I can crochet while I watch :-). I have a lot of cotton yarn on hand from my dishcloth crocheting and have also just bought a bunch of new colors that have come out since the last time I went cotton yarn shopping. I just can't resist the fun little balls of color lol.
I am not interested in making more dishcloths at the moment and in fact probably need to sell some of the stockpile I have, so what to do with all of this yarn? Well, I decided to make an afghan using some of the dishcloths I already had made and then filling in the rest with more dishcloths (squares) made from some of the new colors as well as yarn I had on hand. I wish I could say that I used more of my stash yarn than new yarn bought, but I would be lying. So this is my progress on my "dishcloth" afghan.
I know it is not the norm to use cotton yarn for afghans because it is a little heavier, but I always get a little sad when these beautiful colors are used in dishcloths that get dirty and fade over time. This way I can look at them and enjoy them while sitting under my afghan :-). Dodger helped me some too lol.
And don't forget that free shipping continues at My Very Own Quilt Shop through 10/21. Use coupon code BDAY2012.
http://www.myveryownquiltshop.com/
I am not interested in making more dishcloths at the moment and in fact probably need to sell some of the stockpile I have, so what to do with all of this yarn? Well, I decided to make an afghan using some of the dishcloths I already had made and then filling in the rest with more dishcloths (squares) made from some of the new colors as well as yarn I had on hand. I wish I could say that I used more of my stash yarn than new yarn bought, but I would be lying. So this is my progress on my "dishcloth" afghan.
He is such a good kitty. Very playful, but loving too. We are very lucky that he found us. Here is another cute picture of him on my office chair.And don't forget that free shipping continues at My Very Own Quilt Shop through 10/21. Use coupon code BDAY2012.
http://www.myveryownquiltshop.com/
Thursday, December 15, 2011
Look Ma, No Fingers!
Ok, that's probably not a very good title for a post, but I bet it got your attention, didn't it lol? I find that many times in the winter time, my hands are cold but the rest of me is fine. I've always thought I should get some fingerless gloves, but never got around to actually doing it. When I was in Hobby Lobby a month or so ago, I found a free pattern for some really cute crocheted fingerless gloves. Score! I've seen patterns before, but they were always knitting patterns. Since I don't know how to knit, this posed a problem.
I pulled out the pattern last week along with some cool twisted yarn that I had found at the Humane Society thrift store many moons ago. It looked like it would work perfectly and I was right. After a test run and making some modifications to the pattern to accommodate the yarn weight, I was on my way and had the first glove done pretty quickly. The second went even faster since I wasn't trying to modify and adjust as I went along like I was with the first one. The pattern called for cuffs, but I left those off because I liked them just the way they were without the cuffs.
So here are my new fingerless gloves, which I am actually wearing as I type this. I have two more colors of the twisted yarn left, so I think I'm going to make a couple more pairs. As a side note, I found it very difficult to try and take a picture of my hand while holding the camera with the other hand!
And of course the felines are still around and keeping me entertained. I got a couple of pictures this past week. After two years of watching the other two go up on the plant shelves, Echo finally figured it out a month or so ago and now it is favorite past time. So here are the boys up on a perch overseeing us girls down below. I have vaulted ceilings, so they are about 8 or 9 feet up.
Hope everyone is keeping their stress to a minimum as they get ready for Christmas. I am flying north on Sunday for about ten days. I am all packed except for toiletries so way ahead of schedule. Half the stuff packed is either Christmas gifts or extra towels I'm transporting since we are hosting Christmas and are a bit short in that department. I had a set of brand new ones down here, so it seemed silly to buy more up there if I could just bring these. Thanks to space saver bags, I was able to fit them in. I put Scott's quilt in one of the bags too, so that is also in my suitcase, along with my hand mixer, some food items I am taking, a pinking shears, and some large pocket knives that Scott bought at Cabala's while he was here for Thanksgiving. I would love to see what TSA does with all of that! I hope they don't mess up my stuff too much. It is perfectly packed right now so everything fits.
As I was previewing this post, I heard the birds scatter outside and looked out to see this guy on the wall. Guess he wanted breakfast too.
I pulled out the pattern last week along with some cool twisted yarn that I had found at the Humane Society thrift store many moons ago. It looked like it would work perfectly and I was right. After a test run and making some modifications to the pattern to accommodate the yarn weight, I was on my way and had the first glove done pretty quickly. The second went even faster since I wasn't trying to modify and adjust as I went along like I was with the first one. The pattern called for cuffs, but I left those off because I liked them just the way they were without the cuffs.
So here are my new fingerless gloves, which I am actually wearing as I type this. I have two more colors of the twisted yarn left, so I think I'm going to make a couple more pairs. As a side note, I found it very difficult to try and take a picture of my hand while holding the camera with the other hand!
And of course the felines are still around and keeping me entertained. I got a couple of pictures this past week. After two years of watching the other two go up on the plant shelves, Echo finally figured it out a month or so ago and now it is favorite past time. So here are the boys up on a perch overseeing us girls down below. I have vaulted ceilings, so they are about 8 or 9 feet up.
And Sassy looked so cute sleeping on the bed yesterday that I had to take a picture. The first picture is the first picture I took and the second is after she covered her eyes and begged me to stop taking her picture cause she needed her beauty sleep lol.
Hope everyone is keeping their stress to a minimum as they get ready for Christmas. I am flying north on Sunday for about ten days. I am all packed except for toiletries so way ahead of schedule. Half the stuff packed is either Christmas gifts or extra towels I'm transporting since we are hosting Christmas and are a bit short in that department. I had a set of brand new ones down here, so it seemed silly to buy more up there if I could just bring these. Thanks to space saver bags, I was able to fit them in. I put Scott's quilt in one of the bags too, so that is also in my suitcase, along with my hand mixer, some food items I am taking, a pinking shears, and some large pocket knives that Scott bought at Cabala's while he was here for Thanksgiving. I would love to see what TSA does with all of that! I hope they don't mess up my stuff too much. It is perfectly packed right now so everything fits.
As I was previewing this post, I heard the birds scatter outside and looked out to see this guy on the wall. Guess he wanted breakfast too.
Sunday, November 13, 2011
A Flurry of Finishes!
I have had a very productive weekend and managed to finish up a few projects that have been hanging around for awhile. The first finish was this Friendship Star wall hanging, which was one of the quilts that I made in my beginning quilting class in, ahem, 2001.
This afternoon I finished up this ornament while I was watching the Bears game. S and two of his sons are huge Bears fans and I don't get to see many games down here since I pretty much only have the main network stations, but today's game was on Fox, so I was able to watch. Our AZ Cardinals pulled out a come from behind win over the Eagles too, so good job to them. Please excuse the wrinkles in the ornament. I didn't take time to iron it before taking a picture.
The other thing I finished during the game was this cat mat for the shelter that was started on one of my airplane rides this summer.
I actually have some feline pictures to post as well. First I have Tyrone testing out S's quilt. I got the binding attached by machine this weekend, and also did the same for Chocolate Covered Cherries, so now I can work on the hand stitching as I am watching Christmas movies.
Sassy was sleeping yesterday all curled into a tight little ball. If you look closely, you can see her little foot tucked behind her shoulder. Cats are so flexible!
And finally, here is Echo being his usual dorky self. I have been going through the contents of some of the drawers in my rolling sewing cart and Echo took advantage of finding one empty and decided to take a nap in it. As you can see, he's a little too big, but that didn't seem to bother him lol.
And I had to add this final pic. What are the chances? No, not of having your bobbin run out, but having it run out when you are exactly at the end of attaching a long binding to a quilt. That is what happened to me yesterday when I attached the binding to Chocolate Covered Cherries. I hit the thread cutter, pulled the quilt out, saw the empty bobbin, and thought oh, no, I have been sewing without bobbin thread for who knows how long. But lo and behold, the binding was attached all the way to the end. Amazing.
Sunday, January 30, 2011
A Little Crocheting
I actually took the time this week so sit down and watch Criminal Minds on Wednesday night. I generally can't stand to sit there doing nothing while watching tv, so I pulled out the crocheted rug I've been working on for quite awhile. It needs one more block. Between the hour on Wednesday night and the hour between 1 a.m. and 2 a.m. on Thursday night when I couldn't sleep, I got the block nearly finished. It's the one in the lower left that has all the untrimmed yarn ends still showing.
Here are all six blocks laid out. I may move them around to balance the colors, but plan to alternate the direction of each block as shown in the picture. I don't plan on backing the rug as I think I'm going to use it in a carpeted area, but I'm thinking I will have to at least block it. I've never made a crocheted rug before, so if anyone has any suggestions, please share them! This one is made using recycled afghan yarn, so a rug was really the only option as the yarn is not in good enough shape for much else. I am also considering donating it to the animal shelter, but I think it would still need some blocking so it didn't curl in the corners.
Thursday, October 28, 2010
Recycled Afghan Project in Progress
A few months ago I posted about recycling the yarn from various afghans. The first one I started with was one that I had made quite a few years ago. This is the afghan before I took it apart:
When I needed something mindless to work on over the last few months, I pulled out the balls of yarn from this afghan and have been making these 11 x 11 inch squares. My tentative plan is to sew them together into a rug. The crocheting is very tight so the squares are pretty sturdy and I think could hold up fairly well as a decorative rug.
Here are the five squares I've completed so far along with the current balls of yarn I'm working with. I believe I got about 14 large balls from the afghan:
I've been lax lately about taking pictures of the felines, but I did get a couple recently. Here's miss princess (Sassy) surveying her kingdom from atop the plant shelf.
When I needed something mindless to work on over the last few months, I pulled out the balls of yarn from this afghan and have been making these 11 x 11 inch squares. My tentative plan is to sew them together into a rug. The crocheting is very tight so the squares are pretty sturdy and I think could hold up fairly well as a decorative rug.
Here are the five squares I've completed so far along with the current balls of yarn I'm working with. I believe I got about 14 large balls from the afghan:
And here is a closeup of a couple of the blocks. I just weave in the next color when I run out of the previous one and then trim the ends once the block is done. I'm using different balls of yarn at the same time to make sure I have enough variety of color in each block. I'm not real pleased with the one that ended up with so much white, but I'm hoping that if I put it between blocks with only a small amount of white, that it will balance out.
I've been lax lately about taking pictures of the felines, but I did get a couple recently. Here's miss princess (Sassy) surveying her kingdom from atop the plant shelf.
And poor Echo. Maya decided that he needed a bath again yesterday *sigh*. She is very thorough and he is very tolerant except if she tries to wash his private parts LOL. Yesterday she just licked and licked and licked for about five minutes before he got tired of it and walked away. She just followed him and started up again LOL.
Sunday, August 1, 2010
Afghan for Nephew's New Baby
One of our nephew's on DH's side of the family had a new baby on July 10th. Ok, he didn't have the baby, his significant other did, but you probably already figured that out. By the time I found out when the baby was due, I didn't have much time to come up with a gift. The first plan I came up with involved using a large piece of children's flannel from my stash, cutting it exactly in half and using half for the front and half for the back. By doing do, the quilt ended up just the right size for a baby and I had an easy to make gift.
After I got the quilting done on the quilt, I ran across this afghan at the thrift store. I had a coupon for 30% off, which made the price about $1.50. Can you believe it? $1.50!!! It is in perfect condition and much more appropriate right now for a summer baby. So I snapped it up and both Dawn and I thoroughly examined it to make sure it was indeed gift worthy. I ran it through the wash and it's been wrapped and mailed and is on the way to it's recipients.
Here is the full afghan:
And here's a close-up of the pattern and yarn. It's really pretty in person.
It is kind of depressing to see items like this end up in a thrift store after someone put so much work into it, but I'm glad I was able to rescue it and hopefully give it to a good home, provided the parents like it and will use it.
Oh, and I had an unplanned break to my work the other day.
Why, you ask?
Well, it could have been this that did it:
After I got the quilting done on the quilt, I ran across this afghan at the thrift store. I had a coupon for 30% off, which made the price about $1.50. Can you believe it? $1.50!!! It is in perfect condition and much more appropriate right now for a summer baby. So I snapped it up and both Dawn and I thoroughly examined it to make sure it was indeed gift worthy. I ran it through the wash and it's been wrapped and mailed and is on the way to it's recipients.
Here is the full afghan:
And here's a close-up of the pattern and yarn. It's really pretty in person.
It is kind of depressing to see items like this end up in a thrift store after someone put so much work into it, but I'm glad I was able to rescue it and hopefully give it to a good home, provided the parents like it and will use it.
Oh, and I had an unplanned break to my work the other day.
Why, you ask?
Well, it could have been this that did it:
You could never accuse Echo of not getting comfortable wherever he's at. I know sooner snapped the picture when he suddenly rolled into the cup full of pens, etc., behind him, which of course tipped over hitting all of the other junk around it on my desk (yes, my desk is very messy right now), and startling him into full awakeness, which of course knocked more things over and off the desk. He's such a dork sometimes :-).
Friday, July 30, 2010
Recycling Afghans & Kitty Convention
I mentioned in my catchup post that I'd bought some afghans recently from the thrift store in order to recycle the yarn. Before I ever bought any afghans, I recycled one of my own. I had most of it torn apart before vacation, but had a few squares to finish when I got back.
Here's what the afghan looked like before. This afghan was made by me long before I was a quilter and it got a lot of use. I really liked the pattern I made up, but it was coming apart in a number of places and needed more repairs than I was willing to do. I decided that recycling the yarn to make cat mats or a new scrap afghan would be the best use of it at this point.
And a close-up of the block pattern:
And here's what I had after everything had been torn apart:
Rather than wash all of this yarn to get the kinks out, I spent a lot of my TV watching time last week winding it into numerous larger balls that should relax the kinks if left that way for awhile. I didn't tie the yarn together like I did for the cotton yarn scraps I wound into a ball because I don't yet know what I'm going to do with this yarn and if I do anything other than my cat mat pattern, I don't want knots because there will be nowhere to hide them. I ended up 14, four inch diameter balls of yarn from the pile of scraps above. That is quite a lot of yarn that I now have to use for something else and it didn't cost me a dime!
Now on to the kitty convention. I walked into our bathroom last night and this is what I found going on in the separate toilet room. I've never found all three of them in there at the same time.
I'm assuming they were looking for bugs, crickets, etc. to play with. It's also scorpion season here and so far the score is Cats - 4, Laura - 2, and Scorpions - 0. Sassy has found two and Echo and Tyrone have each found one. Of course we don't let them play with them or try to kill them themselves, but they are really good at spotting them for us so we can arrive with a shoe to take them out. We seem to get quite a lot of the crickets, scorpions, etc. in the area of this bathroom and I think they come in through the vents and are attracted to the water. Tyrone is always staring at the ceiling near the vents in either the toilet room or the master bathroom, so I'm guessing it's because he sees stuff come out.
Monday, July 5, 2010
Crocheted Cat Mat Tutorial
I recently posted about the cat mat I made for Sammy with my cotton yarn scraps. While hers was extra large size to fit her chair, I have made smaller cat mats for the Arizona Humane Society. I thought it might be fun to do a tutorial for making these mats since they are made in the round to make them a double thickness. This is a bit different than your average crochet project.
All of the cat mats I make are crocheted with a size G hook. The smaller mats take exactly 5 ounces of yarn, which is a standard Red Heart Yarn skein size. I don't know how much yarn I used in Sammy's mat because it was made from scraps. All of the directions in this tutorial will be for the smaller size mat. If you want a larger mat, just increase the size of your starting chain, but realize that you will also need more yarn. Please note, the tutorial instructions assume that you have a basic knowledge of crocheting.
Let's begin.
Step 1 - Chain (ch) 51
Step 2 - Single crochet (SC) in second ch from hook and in each ch across. Your project may look like this and that's ok:
Step 3 - This step is tricky and where we establish the pattern of working in the round. YOU ARE NOT GOING TO TURN YOUR WORK. Instead, you are going to do your second row of SC in the bottom loops of the original chain. You are also going to tuck in your beginning yarn tail at the same time. You're going to have to stretch a bit to make the first stitch around the corner at the end. Like this:
See how you are reaching through to get to the back loop? Pull your yarn through and complete the SC.
Here's a picture of the second stitch in the back row. See how I'm capturing my starting yarn tail with the stitch so that it gets buried?
After a number of additional stitches, the tail is pretty much buried and you can either clip off the remainder or leave it. It will be tucked inside the mat and won't show so it doesn't matter which way you go. Do whatever floats your boat.
Continue across the row, making a SC in the back loop of all of the Row 1 SCs. When you are done with the stitches on both sides of your original chain, your piece should look like this:
Step 4 - This step is where the fun begins. From here until we get to the end of our mat, we are just going to stitch around and around and around and ALL STITCHES FROM HERE ON OUT WILL BE IN THE BACK LOOPS ONLY. There's only one trick to getting this process started correctly. You want to make sure that you only make stitches in your previous stitches and not in the ends of the rows. If you start putting stitches in the ends of the rows, the sides of your mat won't go straight and it will start to expand in size and take on a weird shape. This isn't good. It's going to look strange, but trust me, the first couple of stitches when you go "around the corner" and start the next row will be huge compare to the rest of the stitches. That's ok! It's what's necessary to get around the corner without adding stitches and the big stitches will all blend in at the end of the day.
See how I'm not going into the opening at the end of the row, but pulling the yarn through the back loop of the stitch across from the one I'm in (i.e. the one that shares the same beginning chain space as the one I'm currently in)?
As you continue to add stitches in Row 3, your piece will begin to curl up on the end. That's ok. It's supposed to do that.
The curl will probably be pointing towards you, but we actually want it going the other way, towards the inside of the mat. Just flip it back so it looks like the picture below and continue on your way across the row.
Step 5 - Continue to crochet round and round making sure you don't add stitches to the end. That should be easy to avoid after the first few rows, provided you didn't add any stitches in those rows. If you did those correctly, you will just keep putting stitches in the previous row's stitches. After a few times around, your piece should be looking like this:
After even more rounds are done, you should have a pouch starting to form:
If you've used scraps of yarn and tied them together like I did for Sammy's mat and the mat above, you can see how you can put the knots on the inside of your stitching to keep them hidden inside the mat. It will eventually be stitched shut (more on that later), so you will never see the knots once you are done. Here's what your "pouch" looks like from one side if you lay it flat:
Step 6 - Continue to crochet round and round until you get the size mat you want or you run out of yarn, whichever comes first. Just kidding. Obviously if you run out of yarn and your mat isn't big enough yet, you will have to get more yarn! When your mat reaches the size you want, DON'T CUT YOUR YARN. Before you cut your yarn, we need to measure how much we need to complete the final assembly of the mat.
Your last stitch should be one stitch before the end of the row, as shown in this picture. In case you didn't notice, the "mat model" has just switched to Sammy's mat. That's because I didn't take pictures of the starting process when I made her mat, so I had to start another one for the first part of the tutorial. Her's wasn't the correct size for the tutorial anyway, but it works for the finishing steps.
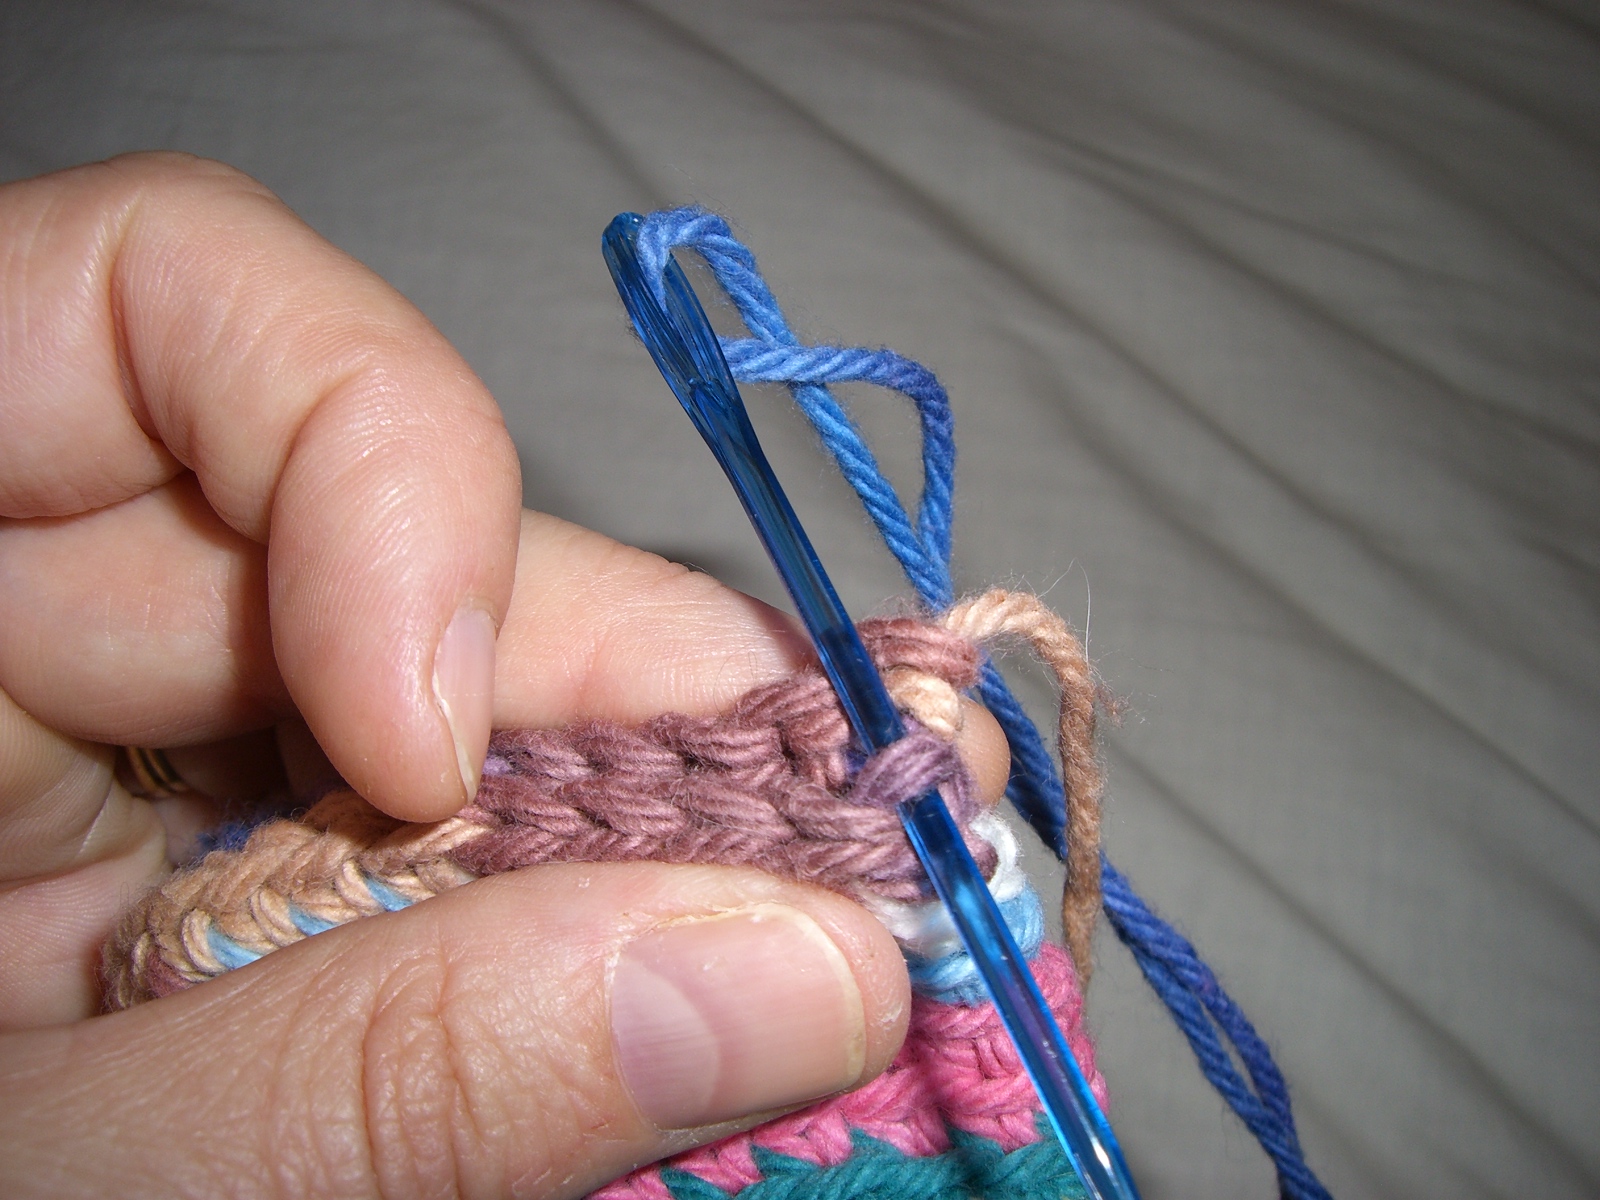
Step 7 - The Finishing - In addition to your mat, you will also need a Yarn Needle or large Tapestry Needle. I use a plastic yarn needle purchased at Hobby Lobby that looks like this.
To determine the length of yarn you need for finishing, I lay the yarn loosely back and forth three times across the width of the mat and cut the yarn at the end of the third pass.
Pull the yarn through your ending loop like this:
We're not going to sew the mat together. The first stitch will come over the top of the mat opening to the loop on the opposite side as where you put your final stitch.
We're going to sew across the mat with a weaving stitch. The next pictures show how the first couple of stitches will be made.
Last stitch of the first weaving pass. See the red stitches and how they alternate on each side?
For the second weaving pass, your stitches will go in the opposite spaces as the first pass. The first picture shows how you will turn the corner to begin the second pass.
Starting the second weaving pass:
Second pass after a number of stitches:
When you finish the second pass weave the yarn back into the mat interior and back out a number of stitches in the opposite direction and clip. A slight tug will pull the raw end into the mat interior to hide it.
Good job! You're done. If you started with a 51 stitch chain, your finished mat should look something like this:
Or this:
Subscribe to:
Posts (Atom)