Showing posts with label Small Quilts. Show all posts

Tuesday, April 11, 2017

A Couple of Finishes!

Wow, it has been almost a month since I've written a post.  I knew I was going to likely skip the week that I was preparing for a retreat; however, I was not prepared to come home from the retreat with a horrible cold that lasted for over two weeks.  I am not one that normally gets chest colds or coughing with my colds, but I sure did this time.  The cough is finally about 95% gone and my nose has stopped running 24/7.

I finished sewing the binding down on an old UFO just prior to the retreat.  I originally pieced this little quilt in 2010 while living in AZ.  I was starting my first machine applique project, so I wanted to do some practicing with my machine and the stitches before I worked on the "real" quilt.  I had some scraps of batiks laying around that already had fusible on them from making a Snippet Sensations quilt so I fused them on a piece of background fabric in a random pattern, practiced my machine applique skills around each piece, added a border and dubbed the finished quilt top "Collage Applique".  Just now as I was typing that I realized that "Applique Collage" is probably a more accurate name, but the label is already made (shocking for me) and I am not changing the name now :-).  I got the center half quilted while still in AZ, probably also in 2010 and then the quilt just sat and sat.  I finally pulled it back out, finished the quilting and got it bound.  It has now lived in 3 different states and I've had two different names since it got started, so it was time to get it done.  Here is the finished quilt.  Now I just need to find the perfect place to hang it :-)


I also got my Tumbling Nine Patch quilt completed at the retreat.  This quilt is a shop sample and only baby size, so since it will likely be either donated for a baby or gifted for a baby, I opted to attach the binding by machine to get it done and off the to do list.  There are a number of methods used to attach binding by machine.  I didn't want a lot of fuss and worry about having to line things up so I opted to attach the binding to the back of the quilt, pull it to the front and to stitch it down using a blanket/buttonhole stitch.  I am very happy with how the front looks.  Does the back look great?  Well, not so much, but I used a thread that matched the backing so unless you are looking close, it doesn't look bad.  And again, this quilt will eventually be used by a baby and will get washed and washed, so machine binding was a good choice for this quilt.  Below are pictures of the finished quilt and a closeup of both the front and the back of the binding.  I do have 3 kits of this quilt made up in the shop.  You can find them HERE.


I have also been plugging away on my Perkiomen Daydreams blocks and have 6 rows completely assembled.  Well, technically I have a block flipped on the far left side of row 6.  I have unpicked the stitching since taking this pic, but still have to sew it back together.


Wednesday, March 15, 2017

2 Hour Table Runner Finish, a New Iron & a Cutting Mat Bath!

I have gotten way behind in my bindings as I've gotten absorbed in my Perkiomen Daydreams blocks and now I have a huge backlog of quilts needing binding. So, to remedy that situation I have decided to go back to only doing hand work while listening to Daily Audio Bible. I have mostly followed that plan and finally finished sewing down the binding on this two hour table runner last week that has been quilted and half sewn down for months.


This version of the runner is sold out in the shop, but we still have black and red versions, blue and tan and a bright reindeer version available.  You can find them all HERE.


I also made progress on the next binding in the queue and should get this little quilt finished this week.


My cutting mats finally got a bath this past week as well!  It was long overdue.  Too long as it turned out as some of the deepest cuts were just too far gone to heal.  Both of the mats that I washed were 10-15 years old and it was becoming very difficult to cut on them and my rotary blades were becoming dull very quickly.  While the worst parts of both mats didn't really get better, both are reversible and the other sides are in excellent shape, as are the outer parts of the bad sides, so they are still usable.  I will be starting this maintenance on my newer mats now to hopefully keep them in great shape for longer.  There are directions all over the Internet and how and why to do this, but these are the instructions I used today:  http://sew-fantastic.blogspot.com/2009/11/make-your-self-healing-mat-last-much.html


Out of the bath and drying:


Finally, it was an exciting week last week in that I got a new iron after at least 10 years of using the old one.  I would have been very happy to continue using the old one as I loved that iron, but it had started to randomly spew rusty water out.  Not good when you are pressing very light fabrics.  And my new ironing board cover has stains now as well :-(.  I am very careful to empty the water after each use and to only use distilled or purified water, but alas, after that much use, this was bound to happen eventually. I paid just over $20 for the iron brand new so I most definitely got my money's worth. And yes, it ...was made in China. Just like the replacement model I purchased. The new iron was still only $28 from Amazon with free shipping so if it lasts half as long as the previous version I will be thrilled, but I am hoping it lasts much longer. I love these Panasonic irons and I really love the retractable cord! They also get nice and hot and they heat up quickly. And they are fairly lightweight which is important to me.

And that sums up all of the exciting events in MY life last week :-).  Oh, and we also found a great like-new sectional for our formal living room, so that was fun too :-).  And of course the remodel work on the rest of the house continues to move along.  Last week involved finishing the painting in the living room.  This week it is back to baseboard cleaning and staining.


Monday, February 13, 2017

Quilting Fun at Retreat!

The weekend before last I attended a quilt retreat at Thumper Pond Resort in Ottertail, MN.  This is my third year attending this retreat, but the first year that I lived only about 60 miles away.  Since the weather forecast was good, I opted to take mostly county roads rather than state highways, hoping for some great scenery as well as the opportunity to see some of the area near our new home.  I was not disappointed.  The drive was beautiful in both directions with lots of lakes, woods, winding roads and rolling hills.  I also discovered that there are Amish living about 30 miles from us.  My husband's heritage is Amish, so we find it very cool to be living so close to them.  We will definitely be going back to that area as it looked like there was at least one family that made furniture and we want to see what other goods we might find.  When I traveled through Amish country in Wisconsin last spring I came home with 3 quarts of honey, some pure maple syrup made by a Gingerich (my husband's surname) as well as several yummy jams.  Scott's father was raised Amish until he was 10 and I wish he were still alive to go with us when we go back to the area.  On my way home, I came across a buggy on the road while in a no passing zone and on a hill.  The horse pulling the buggy was beautiful, but I obviously couldn't get a picture of the horse as I was passing them!  It was just a treat to see them out and about.  On my way TO the retreat, I passed a group of Amish children and their mother playing outside in the snow and having a lot of fun.  While I wouldn't care to give up my conveniences of electricity, computers, etc., it was refreshing to see children outside playing on a nice day rather then glued to various electronic devices.  Of course there are adults who are just as bad and just as addicted to their cell phones, computers, etc.

So back to the retreat.  My first goal was to get some quilts quilted since I was in free motion quilting mode.  I believe I took 5 basted quilts and I got two of them completely quilted and a third one is in process.  The first one I quilted was Tumbling Nine Patch by Sweet Jane's Designs.  This quilt is for a shop sample and I will be putting together some kits.  I really, really like quilting swirls and allover swirls were a good pattern for this quilt, so off I went with my swirls.  Below is the quilted quilt and a closeup of the quilting.


Next up was quilting my Reef table runner.  This should have been a quick and easy job, but it was anything but.  The Sulky rayon thread I was trying to use on the top keep shredding and breaking.  I tried a different size needle.  Same result.  I went and bought Microtex Sharp needles from the vendor and tried one of those.  Same result.  I re-threaded and tried yet another different needle.  Same result.  After consulting my quilting friends, the only thing we could conclude was that the batik fabrics were shredding the thread due to the tightness of their weave.  I have a practice quilt sandwich with me that is made from muslin so I tried the thread on that and it seemed to work fine, so it could very likely be the batiks.  Fortunately, I had a cotton thread with me in virtually an identical color, so I was able to keep going with the quilting without ripping out the first quilting done in the rayon thread.  The two threads look so similar that you really have to inspect to figure out which end of the runner was originally started with the rayon.  The rayon has more sheen than the cotton, but you even have to look for that, so problem handled and the quilting got done.  This little quilt is also a shop sample and it is a free pattern included with the Reef Charm Pack by Timeless Treasures.


Once those two quilts were quilted, I decided to give my shoulders and arms a break and worked on making and attaching some bindings.  The little quilt below had the binding completely attached by machine so I could send it back to Grand Forks with one of my quilting friends for donation to our Guild's Outreach program for foster children.


I got a couple more bindings attached and ready for the hand sewing and then I went back to quilting.  Next up was Oh Christmas Tree and more swirls :-).  What can I say, I've got those down and they look nice as an allover pattern.


I got about half of the quilt quilted and then I reached machine quilting burnout for the weekend and switched to piecing for the rest of the time.  I only brought one piecing project to the retreat because it is in the early stages and has 10,000 pieces, so I was pretty sure I wasn't going to get anywhere close to finishing and needing another project to work on lol.  I've continued working on the project since I've been home from the retreat and I am now working on blocks for row number 4 of 20.  There are 20 blocks in each row.  Now that I've got 3 rows laid out, the design is starting to emerge.  The pattern is Perkiomen Daydreams by Bonnie Hunter of Quiltville and it's in her first book titled Scraps and Shirttails.


Monday, January 23, 2017

Finished Current Projects & Progress on an old UFO

I have made sure to spend time in my sewing room every day since getting home from the retreat and I have finishes to show for it!  Actually one of the finishes came in the truck on a road trip to pick up the 1000 square feet of flooring that we purchased, but a finish is a finish no matter where it happens!

I was on a roll with the Dancing 9 Patch top, so I kept going and not only got the top finished, but I also have the backing made.  I have a huge pile of unquilted tops, so one of my goals this year is to try and quilt each top as it's finished.  Sometimes quilts need to sit for awhile before quilting to figure out what will look best or just because you are so sick of the top by then that you can't stand to look at it for one more second LOL.  I'm still excited about the Dancing 9 Patch top, so I want to strike while the iron is hot.  I have plenty of batting on hand, so I just need to get that cut and the quilt basted so I can start the quilting.

Here is the finished top followed by the quilting design that I have decided on.  It really is true that if you practice a design over and over by drawing it on paper, that WILL translate to quilting your quilt.  I did the same thing when I was trying to learn an allover swirl quilting design and now I'm trying it with another design.  I've seen this one referred to as headbands and mussels and I'm sure there are plenty of other names for it as well.  I get huge pieces of packing paper in with my fabric shipments and I realized last week that they would be perfect for practicing doodling allover quilting designs.


The finish I mentioned came in the form of sewing down the binding on this small quilt that I pieced in 2015 and quilted last year.  It was one of them that got the swirl quilting.  It's a disappearing 9 patch pattern.  I got the entire binding sewn down in about 2 hours of our 3 hours of road time going to and from Fargo for our flooring.  I was shocked at how fast it went and realized that quilts with batik binding seem to take me much longer to sew down as the tighter weave makes it more difficult to push the needle through, even with the use of a thimble.   But I will still use my beloved batiks :-).


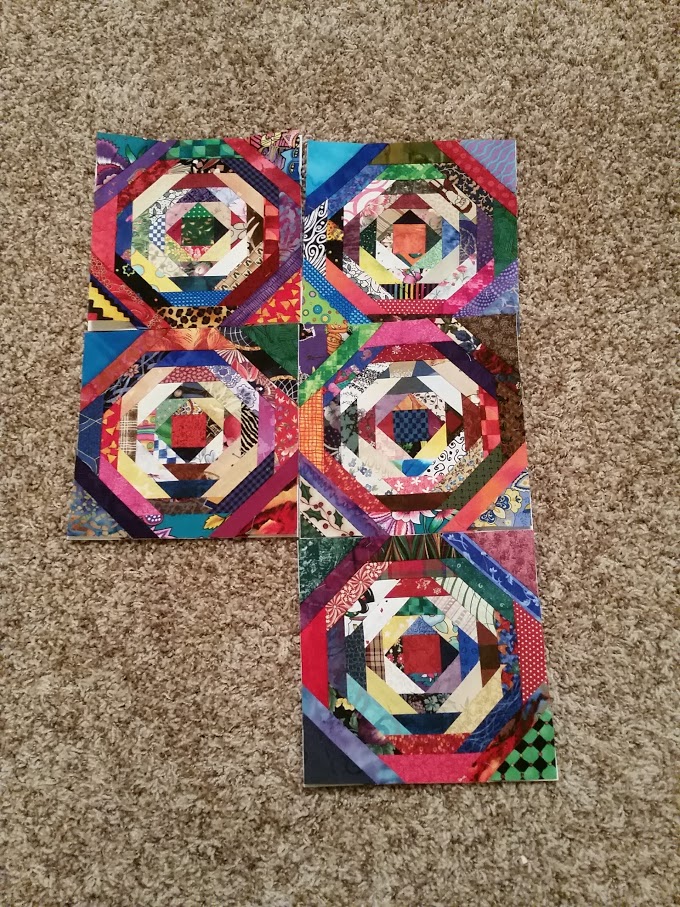
I have also been slogging along with updating my UFO lists and creating a detailed list in a notebook with all of the steps/materials needed to complete the project.  One of the quilts in progress was a pineapple quilt.  It's hard to really call it a quilt in progress when all it consisted of was 6 pineapple quilt blocks barely started.  I do still have a large pineapple quilt on my "must make" list, but in the spirit of getting something done with these barely started blocks right now, I decided to finish them all and make a small table runner out of them.  I got 5 of the 6 done before I called it quits last night.  Digging through bags of scraps for just the right pieces was so. much. fun.  Now I actually do want to start a large pineapple quilt lol.  But I will wait on that until I put a bigger dent in that pile of quilt tops to be quilted as well as other UFOs.  Pictured below are a couple of blocks in progress, the five finished blocks and my piles of scraps.


Finally, on a quick note about quilt shop business, it's the time of the month that our latest Fabric Club selections are posted.  We currently have three clubs - a Fat Quarter Club, a One Third Yard Club and starting this month, a Half Yard Club.  In each case, you get six coordinated batik fabrics in the cut size applicable to the club you are in.  This month we have grays and turquoises and the fabric selections are below.  


Monday, January 16, 2017

Quilting Retreat Weekend!

Quilting Retreats are always conducive for me getting things done and this past weekend was no exception.  I left on Friday for the drive back to Grand Forks for a day long quilting retreat the next day.  One of my quilting friends graciously offered me a warm bed for Friday and Saturday night so I could continue coming to these retreats, which are held every 2-3 months at a church in Grand Forks.  These particular retreats are so popular that once you make it on to the list, you want to stay on the list!  I haven't missed a retreat since I was lucky enough to get in to the first one I attended in March 2015 :-).

For this retreat I took along two small quilts to be quilted and two piecing projects.  I got both of the quilting projects done and made good progress on one of the piecing projects.  The other one never saw the light of day :-).

The first quilt I got quilted was this little strippy string quilt that I pieced last year.  I need to write up some instructions for it that I will share whenever I get them done.  No promises on when that will be :-).  It's not a difficult quilt to piece and you can probably figure it out from the picture and this write-up.  The starting point was leftover ATM machine paper (we used to fill ATMs for our BIL), which is 3 inches wide, and my tins of short strings.  I foundation pieced strings on to the ATM paper in segments of various lengths.  I added chunks of 3 inch strips from the strip bins between the string segments in order to break things up a bit.  Finally, I added narrow sashing between the vertical strips to add some stability to all of those small strings.  The strips were cut 1 inch wide.  Even WITH those stabilizing strips, the poor little quilt developed a leaning problem.  I was able to correct most of the lean with a good basting job and the quilting.  For the quilting I just did randomly placed straight lines.  I start with a drawing a longer line from somewhere in the upper left corner that goes somewhere in the neighborhood of the lower right corner.  I've included a couple of close-up pictures of the quilting below.


The other quilt that I got quilted was a small batik postage stamp quilt.  A second one the same size is in process.  They were supposed to be for our night stands, but I'm not sure they work with our bedroom at the new house, so I will finish them both up and decide then.  They were still fun to make and used up a lot of little batik scraps.  The individual squares finish at 1 inch.  One of the closeup pics has a quarter on the quilt to show the size of the squares.


Once the quilts were quilted I moved on to one of my piecing projects.  Long, long ago I participated in a swap of 2" wide strips of Christmas fabric.  I made the quilt we were supposed to make with the strips, which was a nine patch and hour glass.  But I still had so many strips left that I made a bunch more nine patches and they have been sitting in a plastic storage box just waiting to be used.  And waiting.  Enter Bonnie Hunter's Dancing Nine Patch pattern.  It was PERFECT for getting these blocks into a quilt.  And it's free!  Bonnie has tons of free patterns on her Quiltville website so be sure and check them out.  I didn't get all of the blocks pieced at the retreat, but I was able to finish them up yesterday except for the one I put together wrong which was un-sewn and re-sewn today along with the last block that I didn't think I needed yesterday.  So here they are all laid out and ready to sew into a top.  It looks like a square layout is the way to go.  The main border fabric will be the same as the constant used in the quilt center.


Finally, I finished the stitching on the cross stitch project I've been working on while I was hanging out with my friend I stayed with.  I got my initials and the date on the piece this morning and gave it a good pressing.  This piece is Christmas Zipper by Bent Creek.


Tuesday, June 18, 2013

Batik Postage Stamp Mini

I needed some mindless sewing the last few days so I dug out my baggie of pre-cut light colored batik squares and just started sewing them together.  After awhile I decided that they would make nice little mats for under our bedroom lamps so I sewed twelve rows of twelve squares together and here is the first finished mat.  Each square finishes at 1 inch.  No border to be added.  Just a little grid quilting and binding and it will be done.  I need to make one more for DH's lamp.  The backing and the binding will be this Princess Mirah batik that I have in the shop.  It is from the Temple Life collection.

Sunday, February 24, 2013

Bargello Orphan Block Trivet is Finished!

Woo hoo!  I have another finish already for 2013 and another UFO finish to boot.  It's small, but it's finally done, so it counts.  This little bargello block didn't make the cut for this quilt, so I put a border on it and quilted it.  That was a few years ago.  Last month I finally made and attached the binding and last night after too many hours of tax return preparation, I put in the final stitches of sewing down the binding while watching a movie.  Now I just have to find the perfect place to display it.


And if you are a batik lover be sure to check out our giveaway from My Very Own Quilt Shop that closes this Thursday, February 28th at midnight CST.  Details are in this post.

Thursday, January 31, 2013

A Gaggle of Geese & Other Random Stuff

Tax season is officially underway, but I have been trying to carve out some sewing time in the midst of the chaos as it helps keep me sane.  And calmer lol.  I have been working on a few things this week as I've had some snippets of time.

Way back when, a number of years ago, I started a Corn & Beans quilt made with batiks.  I had extra in all of the strips so using my triangle rulers, I cut flying geese units as well as other block components from the extra.  This week I sewed up a bunch of the geese.  And no, I have not yet finished the original quilt.  In fact, I still have probably half of the cutting left to do.  It's going to be a very large quilt made up of 6" blocks :-).  So here are my gaggle of geese for the week:


I also got the binding attached to this little orphan block trivet that I quilted at least two years ago, probably three:


I haven't posted many cat pics lately, so I thought I would remedy that as well.  When I prepare the fabric bolts for sale in the shop, I clean up the end of the bolt and get rid of the wrinkly part and make a nice straight edge to start with.  Of course being a scrap quilter, I am keeping all of those cutoffs.  In fact, I am keeping them separate and have selected a pattern to make a quilt just from those cutoffs.  Kind of a scrapbook for the shop and a record of all of the fabrics I have ever carried. 

I washed the latest dark cutoffs yesterday and had them piled on the cutting table.  Sassy of course thought they were perfect for a nap.  But then she decided the basket with the unwashed light cutoffs was even more comfortable :-).


Friday, January 18, 2013

Mini Strippy Quilted and Ready for Binding!

I am moving along with my goal of getting my scrappy mini strippy quilt completely done by the end of the month rather than create another UFO.  I have plenty of those already.  I got the quilting done a couple of weekends ago and then got the binding made last night.  I put off making binding FOREVER as it's not my favorite thing to do.  I love hand sewing it down, but hate making it.  I don't know why as it never takes as long or is as bad as I think it will be.  But it is what it is I guess.  I like to make it in batches and get it over with.  I have a pile of more binding to make this weekend and then I should be done for awhile. 

Anyway, here is my quilted Mini Strippy quilt with the binding all ready to go beside it:


And a close up of the quilting.  I did simple straight lines in a random pattern drawn from side to side of the quilt.


And the back:


When I showed my husband the backing I had chosen, he ever so gently said "But it doesn't really match the front".  And then went on to say "The colors match though."  Exactly dear.  Now you are getting it lol.

He may have not loved the backing I chose, but he LOVED the quilting :-).  I do too.  It's exactly what I envisioned and totally different than anything I've done before.  And quick and easy, so perfect.

Wednesday, January 2, 2013

First Finish of 2013!

I am determined to carve out more quilting and stitching time in 2013 so to that end, I cut and sewed the borders on the mini strippy quilt today.  I also cut the binding strips from the same fabric.  It's not a big finish, but a finish is a finish given the drought I've had in that department the last couple of years while I was busy with other things :-).

Monday, December 10, 2012

Changed My Mind About the Border

How about this?  I think it makes the quilt pop and seems to look good with all of the fabrics.  I normally do two borders, but I think a single border on this little quilt would work fine.  What do you all think?


Sunday, December 9, 2012

Finally Some Sewing!

While I've gotten to play with plenty of fabric because of the shop, I can't remember the last time that I actually turned on my sewing machine.  Poor neglected thing.  But that drought ended today!  Woo hoo! 

I started piecing a scrappy piano key border many, many months ago, which isn't done yet, but that's not the point.  The point is that I had alot of scraps left from cutting the pieces for the border, so a couple of months ago I started randomly piecing them together for a mini strippy quilt.  Well I finished the piecing of the strips today AND got them sewn together into the top.  I love it!  It's very, very scrappy, which is exactly what I was going for.  I think I like it without borders, but I'm going to let it sit for a day or two before I decide that for sure.

Getting this little top together was a nice reward for spending most of the weekend working on tax projections :-(.