Showing posts with label Scraps. Show all posts

Tuesday, March 7, 2017

Fun with Leftovers!

I am still plugging away on my Perkiomen Daydreams blocks.  I have enough blocks completed for 7 full rows and 2/3 of an 8th row.  Just a couple more rows and I will be at the half way point.  By assembling rows as a go it breaks up the process, which is nice, and it also means that I won't have to lay out 400 blocks all at once.  Here is a pic of the first 6 rows with rows 1 & 2 joined and rows 3 & 4 joined.  I replaced and re-arranged the blocks in row 5 after getting row 7 completed in order to better disperse fabrics and colors.


Making all of these blocks generates a lot of leftovers, some of which are totally usable in my book, while others go in a bag for my quilting friend who makes art quilts.  I have two types of leftovers from these blocks - strings of a certain length and shorter pieced units that come from cutting the block segments.  I am piecing string blocks with the strings and coasters with the other leftovers.  The plan right now is to make the string blocks into potholders rather than put together in a quilt.  My latest idea is to piece the strings diagonally and use those blocks in a quilt.  Otherwise I will end up with about 50 potholders by the time I am done with this quilt :-).

Before I post the leftover pics, here is a pic with a bunch of block components spread out as I select which one to add to each block.  I try not to duplicate an individual fabric within a block, but it's happened a few times in spite of my efforts.


And here are the leftovers and what I am doing with them.


Wednesday, February 22, 2017

The Stripology Squared Ruler Rocks!

I am a scrap quilter.  That has already been well established.  As such, I'm generally not easily persuaded to buy specialty rulers for cutting this, that and the other, unless I can clearly see a benefit to doing so.  Part of it is not wanting to add more clutter to my sewing room when I don't use said specialty ruler as has happened in the past, nor do I want to waste money on something I don't use when said money could be used to buy fabric :-).  So it takes A LOT to get me to purchase a new type of ruler other than my tried and true Omnigrids that I have in various sizes.  I have considered getting a die cutter, briefly, at various points in my quilting career, to make cutting my scraps down to usable sizes faster and easier.  I have never been able to justify the cost or the space required, so thus far I have continued cutting down my scraps the old fashioned way (i.e. with whichever Omnigrid ruler worked best. Enter the Stripology Squared Ruler.  This ruler is the successor to the original Stripology Ruler.  I was able to resist the original ruler based on my quilting friends' reviews that it wasn't long enough for cutting longer pieces of fabric.  That problem has been solved with the Stripology Squared Ruler.  I was still on the fence about it until Gudren Erla, the designer of the ruler, sent one to Bonnie Hunter of Quiltville for her birthday.  Bonnie is a scrap quilter extraordinaire and when she used her ruler to cut down her scraps into strips for the quilt she was working on, I was sold.

My ruler arrived last week and while there were instructions included noting all of the different things you could do with the ruler, my focus was on cutting down my scraps and cutting my strips for my Perkiomen Daydreams quilt in progress so I just dove in without reading them lol.  I had quite a pile of my own scraps and gifted scraps to be dealt with so I started with those.  I'm trying to turn over a new leaf and deal with scraps as they come rather than storing them in boxes of  "Scraps to be Cut Down", of which there are currently 3 or 4 crammed full.  Oy.  No need to add to THAT backlog, so off I go with my new ruler.  While I couldn't use the ruler for all of the scraps to be cut down, boy did it make short work of the pieces to be cut into strips.  So far, so good. 

Scraps before pressing:


Pressed and ready to be cut into useful shapes, or kept as is (i.e. I keep a box of just triangles that work great for the corners of string blocks or for paper piecing triangle shapes as well as boxes of "crumbs" for paper piecing or crumb blocks).


Trimmed scraps.  The ruler is designed with markings for easy cutting of 1 1/2 and 2 1/2 inch strips, but you can cut pretty much any width strip you need as the ruler has cutting openings every half inch.  You just have to make sure that you count correctly :-).


Next I put the ruler to work cutting more of the bazillion strips that I need for Perkiomen Daydreams.  I want as much variety as possible and I want this quilt to be a scrapbook of fabrics I carried in the shop, so that involves lots and lots of strip cutting of lots and lots of different fabrics.  I stack the fabrics three at a time with pieces that are approximately the same width and I put the widest at the bottom and the narrowest on the top.  Clean up one edge, cut as many strips as you can from the stack and wa la, beautifully cut strips in a fraction of the time.


The biggest bonus so far having purchased this ruler is using it to subcut all of the strip sets I need for Perkiomen Daydreams.  Due to the long length of the ruler, I can easily cut two sets at a time.  This has saved me SO much time!  I will definitely pull out my Stripology Squared Ruler anytime I need to do a major amount of subcutting of strips or strip sets.


So in conclusion, this ruler is a bit spendy compared to other rulers out there, but the quality is great, it's made by Creative Grids so it has grippers automatically built in to avoid slippage, and it's a huge time saver.  The time saving aspect alone makes the cost of the ruler worth as it will pay for itself many times over since as quilters we all know that there are more quilts to make than time in the day LOL.  The larger shape makes it a challenge for shipping, but if I can figure out a way to efficiently ship the rulers, I will definitely stock them in the shop.

And here is the progress on Perkiomen Daydreams since my last post.  The blocks for rows 4 and 5 are completed, but I want to make at least one more row and then shuffle the blocks around to mix up the fabrics a bit more.


Monday, January 23, 2017

Finished Current Projects & Progress on an old UFO

I have made sure to spend time in my sewing room every day since getting home from the retreat and I have finishes to show for it!  Actually one of the finishes came in the truck on a road trip to pick up the 1000 square feet of flooring that we purchased, but a finish is a finish no matter where it happens!

I was on a roll with the Dancing 9 Patch top, so I kept going and not only got the top finished, but I also have the backing made.  I have a huge pile of unquilted tops, so one of my goals this year is to try and quilt each top as it's finished.  Sometimes quilts need to sit for awhile before quilting to figure out what will look best or just because you are so sick of the top by then that you can't stand to look at it for one more second LOL.  I'm still excited about the Dancing 9 Patch top, so I want to strike while the iron is hot.  I have plenty of batting on hand, so I just need to get that cut and the quilt basted so I can start the quilting.

Here is the finished top followed by the quilting design that I have decided on.  It really is true that if you practice a design over and over by drawing it on paper, that WILL translate to quilting your quilt.  I did the same thing when I was trying to learn an allover swirl quilting design and now I'm trying it with another design.  I've seen this one referred to as headbands and mussels and I'm sure there are plenty of other names for it as well.  I get huge pieces of packing paper in with my fabric shipments and I realized last week that they would be perfect for practicing doodling allover quilting designs.


The finish I mentioned came in the form of sewing down the binding on this small quilt that I pieced in 2015 and quilted last year.  It was one of them that got the swirl quilting.  It's a disappearing 9 patch pattern.  I got the entire binding sewn down in about 2 hours of our 3 hours of road time going to and from Fargo for our flooring.  I was shocked at how fast it went and realized that quilts with batik binding seem to take me much longer to sew down as the tighter weave makes it more difficult to push the needle through, even with the use of a thimble.   But I will still use my beloved batiks :-).


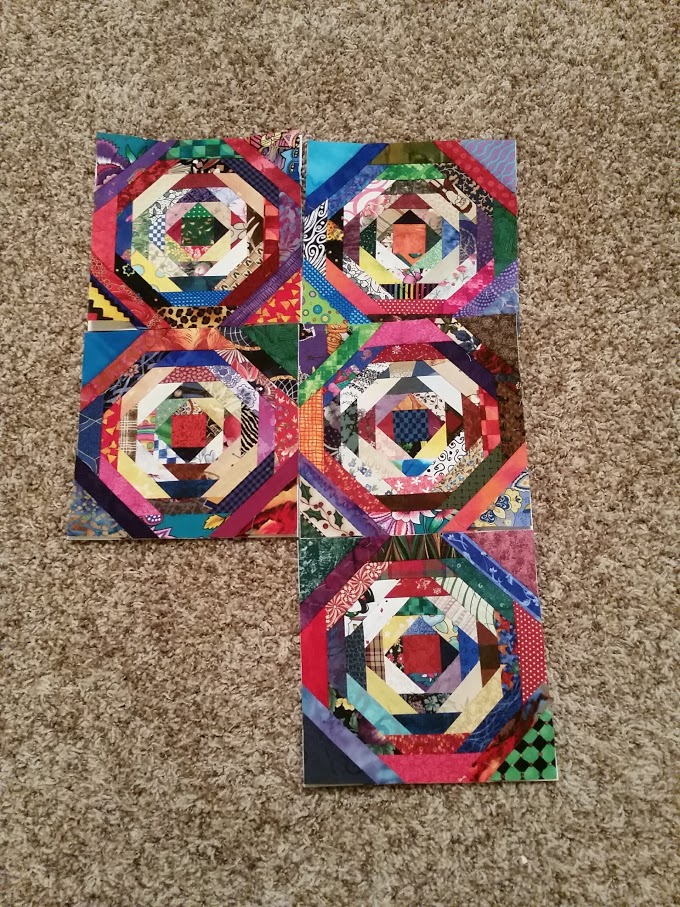
I have also been slogging along with updating my UFO lists and creating a detailed list in a notebook with all of the steps/materials needed to complete the project.  One of the quilts in progress was a pineapple quilt.  It's hard to really call it a quilt in progress when all it consisted of was 6 pineapple quilt blocks barely started.  I do still have a large pineapple quilt on my "must make" list, but in the spirit of getting something done with these barely started blocks right now, I decided to finish them all and make a small table runner out of them.  I got 5 of the 6 done before I called it quits last night.  Digging through bags of scraps for just the right pieces was so. much. fun.  Now I actually do want to start a large pineapple quilt lol.  But I will wait on that until I put a bigger dent in that pile of quilt tops to be quilted as well as other UFOs.  Pictured below are a couple of blocks in progress, the five finished blocks and my piles of scraps.


Finally, on a quick note about quilt shop business, it's the time of the month that our latest Fabric Club selections are posted.  We currently have three clubs - a Fat Quarter Club, a One Third Yard Club and starting this month, a Half Yard Club.  In each case, you get six coordinated batik fabrics in the cut size applicable to the club you are in.  This month we have grays and turquoises and the fabric selections are below.  


Monday, January 16, 2017

Quilting Retreat Weekend!

Quilting Retreats are always conducive for me getting things done and this past weekend was no exception.  I left on Friday for the drive back to Grand Forks for a day long quilting retreat the next day.  One of my quilting friends graciously offered me a warm bed for Friday and Saturday night so I could continue coming to these retreats, which are held every 2-3 months at a church in Grand Forks.  These particular retreats are so popular that once you make it on to the list, you want to stay on the list!  I haven't missed a retreat since I was lucky enough to get in to the first one I attended in March 2015 :-).

For this retreat I took along two small quilts to be quilted and two piecing projects.  I got both of the quilting projects done and made good progress on one of the piecing projects.  The other one never saw the light of day :-).

The first quilt I got quilted was this little strippy string quilt that I pieced last year.  I need to write up some instructions for it that I will share whenever I get them done.  No promises on when that will be :-).  It's not a difficult quilt to piece and you can probably figure it out from the picture and this write-up.  The starting point was leftover ATM machine paper (we used to fill ATMs for our BIL), which is 3 inches wide, and my tins of short strings.  I foundation pieced strings on to the ATM paper in segments of various lengths.  I added chunks of 3 inch strips from the strip bins between the string segments in order to break things up a bit.  Finally, I added narrow sashing between the vertical strips to add some stability to all of those small strings.  The strips were cut 1 inch wide.  Even WITH those stabilizing strips, the poor little quilt developed a leaning problem.  I was able to correct most of the lean with a good basting job and the quilting.  For the quilting I just did randomly placed straight lines.  I start with a drawing a longer line from somewhere in the upper left corner that goes somewhere in the neighborhood of the lower right corner.  I've included a couple of close-up pictures of the quilting below.


The other quilt that I got quilted was a small batik postage stamp quilt.  A second one the same size is in process.  They were supposed to be for our night stands, but I'm not sure they work with our bedroom at the new house, so I will finish them both up and decide then.  They were still fun to make and used up a lot of little batik scraps.  The individual squares finish at 1 inch.  One of the closeup pics has a quarter on the quilt to show the size of the squares.


Once the quilts were quilted I moved on to one of my piecing projects.  Long, long ago I participated in a swap of 2" wide strips of Christmas fabric.  I made the quilt we were supposed to make with the strips, which was a nine patch and hour glass.  But I still had so many strips left that I made a bunch more nine patches and they have been sitting in a plastic storage box just waiting to be used.  And waiting.  Enter Bonnie Hunter's Dancing Nine Patch pattern.  It was PERFECT for getting these blocks into a quilt.  And it's free!  Bonnie has tons of free patterns on her Quiltville website so be sure and check them out.  I didn't get all of the blocks pieced at the retreat, but I was able to finish them up yesterday except for the one I put together wrong which was un-sewn and re-sewn today along with the last block that I didn't think I needed yesterday.  So here they are all laid out and ready to sew into a top.  It looks like a square layout is the way to go.  The main border fabric will be the same as the constant used in the quilt center.


Finally, I finished the stitching on the cross stitch project I've been working on while I was hanging out with my friend I stayed with.  I got my initials and the date on the piece this morning and gave it a good pressing.  This piece is Christmas Zipper by Bent Creek.


Saturday, November 15, 2014

Using up Batting Scraps

Do you save the pieces of batting that you trim off of quilts after they are quilted?  I do.  I don't like to waste anything and batting costs money just like everything else.  Using up the scraps on smaller quilts and projects just makes good fiscal sense in my opinion (that's the former accountant in me) and gives me more money to spend on new fabric.  Not that I need any new fabric, but that doesn't really matter, does it?  LOL

If you do save those scraps, then you probably find the pile growing faster than you can deplete it. Maybe you are like me and get in a rush so you just grab a new piece of batting rather than taking the time to piece together some of those scraps.  So they continue to pile up.  I keep mine in a large basket and also have a smaller basket where I keep narrower batting scraps that I use for making potholders, mug rugs and trivets out of orphan blocks.

The large basket was overflowing and I had a pile of small projects needing to be quilted, so today I have been using the batting from that basket for them, piecing them together as needed.  These orphan blocks are now basted and ready for quilting.


Can you see how I stitched two pieces of batting together for the large block?  Look about half way down and you will see the zig zag running horizontally.

It is super easy to piece batting.  First, I lay out the rough pieces that I need based on the size of the quilt backing.  Then I lay 2 pieces on top of each other that need to be stitched together.  I make a clean, straight cut along the side where they will meet.  Then I use a wide zig zag stitch with a longer stitch length to sew them together.

This batting for one of my small quilts is made up of 4 pieces sewn together.  I had one large piece, but it wasn't wide enough so I pieced together three smaller pieces to make another segment that was then sewn to the original large piece.  As long as you use a wide zig zag you shouldn't get bunching along the joining seam.  The 4 piece batting below is relatively flat in person.  I'm not sure why it looks so puffy in the picture.  I do a quick press with a hot iron which also helps keep the batting flat and the picture may have been before that final press.  PLEASE NOTE - I am using 100% cotton batting or mostly cotton batting in these examples.  Poly batting will need a much cooler iron or it will melt.


The quilt with the 4 piece batting isn't basted yet, but these two are and both battings are made up of scraps I pieced together.  If you look close, you can see that the pink and green quilt batting is made up of three pieces.  I do make sure that the join doesn't fall under a light section of the quilt like the very light sashing on this quilt.  After all of this basting, the basket is still overflowing, but at least it has gone down a bit!


Thursday, January 31, 2013

A Gaggle of Geese & Other Random Stuff

Tax season is officially underway, but I have been trying to carve out some sewing time in the midst of the chaos as it helps keep me sane.  And calmer lol.  I have been working on a few things this week as I've had some snippets of time.

Way back when, a number of years ago, I started a Corn & Beans quilt made with batiks.  I had extra in all of the strips so using my triangle rulers, I cut flying geese units as well as other block components from the extra.  This week I sewed up a bunch of the geese.  And no, I have not yet finished the original quilt.  In fact, I still have probably half of the cutting left to do.  It's going to be a very large quilt made up of 6" blocks :-).  So here are my gaggle of geese for the week:


I also got the binding attached to this little orphan block trivet that I quilted at least two years ago, probably three:


I haven't posted many cat pics lately, so I thought I would remedy that as well.  When I prepare the fabric bolts for sale in the shop, I clean up the end of the bolt and get rid of the wrinkly part and make a nice straight edge to start with.  Of course being a scrap quilter, I am keeping all of those cutoffs.  In fact, I am keeping them separate and have selected a pattern to make a quilt just from those cutoffs.  Kind of a scrapbook for the shop and a record of all of the fabrics I have ever carried. 

I washed the latest dark cutoffs yesterday and had them piled on the cutting table.  Sassy of course thought they were perfect for a nap.  But then she decided the basket with the unwashed light cutoffs was even more comfortable :-).


Tuesday, February 22, 2011

A Sneak Peek

Even though I still haven't sewn the backing for Chocolate Covered Cherries, I have technically started on my next project.  What can I say...I have a very short attention span!  But the backing will get sewn.  And soon. 

Here is a sneak peek at the next project:


It all started with this, a pile of dot fabrics that Wanda sent me awhile back.  She saw my post about all of the new dot fabrics I had purchased and asked if I wanted her leftovers from her dot quilt.  Duh, of course I wanted them!  I love playing with other people's scraps.  Even better than playing with my own lol.  And now I have a plan for them and am almost ready to get started.  I need to go through some more fabric and then I should be ready to go. 


It's been awhile since I've posted any pictures of the feline members of the household.  That is because I've hardly taken any!  Shocking I know.  But I did get a few of Sassy helping with dinner on Sunday.  

Hmmm, what's this thing that has cool water droplets on the top and smells good?


Maybe I should get a closer look...


And how about a view from the other side?


Maybe touching it will help me figure out what this is...


She was totally fascinated with the crock pot for about 10 minutes and then finally gave up and left.  Oh, and she's also trained me to run water for her in the front bathroom sink so she can drink it while it's running *sigh*.  I don't know why I do those things for that cat.  It's not like it keeps her out of trouble LOL.


Sunday, March 14, 2010

Work & Scraps & Nine Patches, oh my!

Work kept me pretty busy this past week as well as this weekend, but I did manage to squeeze in a bit of quilting time.  For a few of the evenings after work, I sketched out a quilt I want to make while watching TV.  The rest of the evenings were spent prepping my little 3 inch 9 patches for sewing into square in square units.  Echo closely supervised me while I was cutting the squares in half to make the triangles for the units. 


I don't mind Echo supervising because he's usually a hands off sort of supervisor.  He watches every movement very intently, but doesn't touch anything.  DH says he's "writing to the hard drive".  Sassy, on the other hand, is a micro manager, so she's not usually allowed to participate.

Here's what we had done after we finished the work pictured above...a box full of units waiting to be sewn.


And sew I did today.  In just a couple of hours, I was able to power all of the pinned units through the machine going first down one side, flipping the entire chain around, and then sewing down the other side and pressing both sides once the entire chain was sewn.  Most of the blocks were getting the first two sides sewn on, but a small stack had been ready for the second side.  This is where the project stands now.


You can see that the stack with the triangles on both sides has uneven edges.  This is on purpose.  The nine patch units are made from the leftover strips from a scrap club exchange back in 2003.  They were 1 1/2 inch strips, or they were supposed to be.  Some were actually a quarter inch too small, so the edges of some of the little 9 patches are very uneven.  There's not much room for fudge factor when they finish at 3 inches.  To resolve the discrepancies in size, I cut oversized squares in half from the stash of pre-cut squares.  That way I can trim the finished square in square units down to 5 inches.  As an added bonus, the finished blocks end up looking like the 9 patches are floating, which looks pretty cool.  This is an old UFO so I'm hoping to get the blocks done in the next week or so and then start laying out the top.

You might think that the "scraps" referenced in the post title refers to the scraps I used in the blocks above.  It does, but it also references these:


A fellow blogger was selling some of her scraps, which were mostly Free Spirit and Michael Miller fabrics.  My stash is severely lacking in large scale and modern prints, so these scraps are a nice addition to my stash.

And finally, Sassy started complaining when she saw that Echo got to be in the post, in the first picture no less, so I told her I would put in a picture of her as well.  God knows we have plenty of them.  Here's her supervising my work this week.  Actually, it looks like she's gone to sleep on the job.  Slacker.


Sunday, March 7, 2010

Awesome day yesterday!

As planned, I did spend the day at Dawn's sewing and it was quite the productive day.  At the top of my list was to finish the color catcher string block top that I posted about here.  I finally decided on a layout, but needed 4 more blocks first.  I happened to have exactly 4 more color catcher foundations on hand from washing my aunt's quilt.  I pieced those first using the strings from the scrap bag I just finished cutting up to add variety to the strings I had already used.  Actually, I found out that I must have previously cut up some amount from that bag as some of the fabrics had already been used, so I think I got even more from the bag then I thought.

Here is the almost finished top.  I say almost finished because Dawn and I concluded that the yellow squares need some sort of applique in them as they are so large.  First we were thinking hearts, but those don't really go with the overall look or name of the quilt, which we are calling All That Jazz because it reminded her husband of New Orleans and Mardi Gras.  I already have a quilt named Mardi Gras so that name was out.  Then I thought of purple flowers with a yellow center, but that doesn't really go either, so now I'm thinking a square of the purple border fabric placed askew in each of the yellow squares.  What do you all think?  Any and all ideas are welcome.  Leave me a comment or send me an email with your opinions, please.


We took a break to go get lunch and while we were at it, we checked out a new quilt shop in our area.  It's really nice and we will definitely be back.  I picked up a few pieces to come home with me.  The pink was on sale for $6/yard, so great deal on that one and I definitely couldn't pass up lime with dots, or the geometric bright pattern.


And finally, if you are still reading, my DH called part way through the day and was confused that I had received a FedEx package.  He read me the return address and I knew it had to be the scraps that Thelma of Cupcakes 'n' Daisies had sent me.  We were chatting about scraps one day and I told Thelma that I would gladly take her scraps off her hands whenever she wanted.  Next thing I know she's offering me her bag of Faceted Jewels scraps.  Scraps that are Batiks to boot.  Of course I said yes immediately and the bag arrived yesterday.  I thought it was a quart size bag, but it was a GALLON ziploc and it was full.  And let me tell you folks, these are not scraps.  These are perfectly cut or pieced unit components that Thelma didn't use in her quilt, so the bag is actually more like a quilt kit then a bag of scraps.  THANK YOU THELMA!!!!  I already have 4-5 ideas swirling as to what to do with these pieces and once I decide, everything is ready to just sit down and sew.  Fun, fun.  I sorted all of the pieces and then put them back away in the bag while my ideas are marinating.  Here is what was in the bag.


Whew, what a great day yesterday, from start to finish.  I had planned to work today, but not sure how that's going to go.  I'm not motivated at all.  I have a massage later, which I desparately need, and I still have some household things to take care of before I can even get started on work, so there's not much of a window left at that point to get anything major done.  And the Oscars are tonight, so forget working after the massage.  So, I think maybe it will be a light day of work getting some billing done, always a good thing if I want to get paid, and maybe some "pre prep" work and corporate extensions.  Easy stuff.  And then back to the salt mines tomorrow.