I recently posted about the cat mat I made for Sammy with my cotton yarn scraps. While hers was extra large size to fit her chair, I have made smaller cat mats for the Arizona Humane Society. I thought it might be fun to do a tutorial for making these mats since they are made in the round to make them a double thickness. This is a bit different than your average crochet project.
All of the cat mats I make are crocheted with a size G hook. The smaller mats take exactly 5 ounces of yarn, which is a standard Red Heart Yarn skein size. I don't know how much yarn I used in Sammy's mat because it was made from scraps. All of the directions in this tutorial will be for the smaller size mat. If you want a larger mat, just increase the size of your starting chain, but realize that you will also need more yarn. Please note, the tutorial instructions assume that you have a basic knowledge of crocheting.
Let's begin.
Step 1 - Chain (ch) 51
Step 2 - Single crochet (SC) in second ch from hook and in each ch across. Your project may look like this and that's ok:

Step 3 - This step is tricky and where we establish the pattern of working in the round. YOU ARE NOT GOING TO TURN YOUR WORK. Instead, you are going to do your second row of SC in the bottom loops of the original chain. You are also going to tuck in your beginning yarn tail at the same time. You're going to have to stretch a bit to make the first stitch around the corner at the end. Like this:

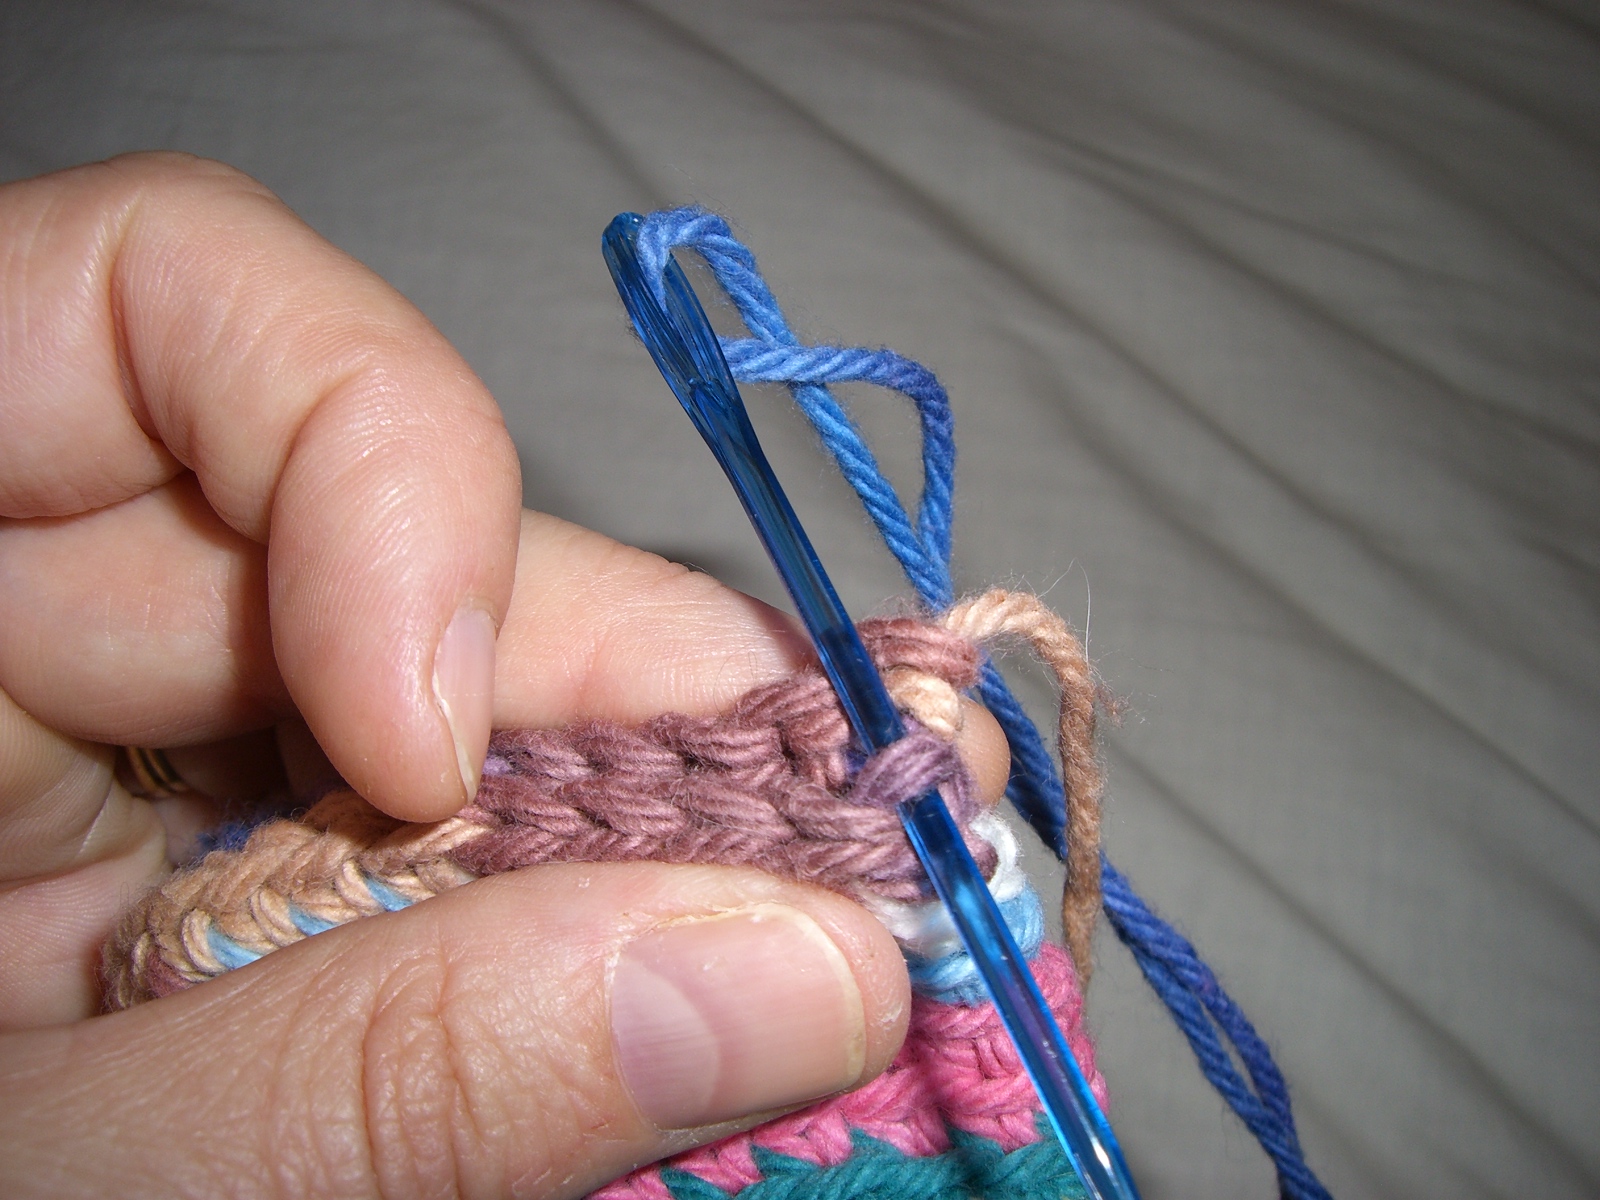
See how you are reaching through to get to the back loop? Pull your yarn through and complete the SC.
Here's a picture of the second stitch in the back row. See how I'm capturing my starting yarn tail with the stitch so that it gets buried?

After a number of additional stitches, the tail is pretty much buried and you can either clip off the remainder or leave it. It will be tucked inside the mat and won't show so it doesn't matter which way you go. Do whatever floats your boat.

Continue across the row, making a SC in the back loop of all of the Row 1 SCs. When you are done with the stitches on both sides of your original chain, your piece should look like this:

Step 4 - This step is where the fun begins. From here until we get to the end of our mat, we are just going to stitch around and around and around and ALL STITCHES FROM HERE ON OUT WILL BE IN THE BACK LOOPS ONLY. There's only one trick to getting this process started correctly. You want to make sure that you only make stitches in your previous stitches and not in the ends of the rows. If you start putting stitches in the ends of the rows, the sides of your mat won't go straight and it will start to expand in size and take on a weird shape. This isn't good. It's going to look strange, but trust me, the first couple of stitches when you go "around the corner" and start the next row will be huge compare to the rest of the stitches. That's ok! It's what's necessary to get around the corner without adding stitches and the big stitches will all blend in at the end of the day.
See how I'm not going into the opening at the end of the row, but pulling the yarn through the back loop of the stitch across from the one I'm in (i.e. the one that shares the same beginning chain space as the one I'm currently in)?

As you continue to add stitches in Row 3, your piece will begin to curl up on the end. That's ok. It's supposed to do that.

The curl will probably be pointing towards you, but we actually want it going the other way, towards the inside of the mat. Just flip it back so it looks like the picture below and continue on your way across the row.

Step 5 - Continue to crochet round and round making sure you don't add stitches to the end. That should be easy to avoid after the first few rows, provided you didn't add any stitches in those rows. If you did those correctly, you will just keep putting stitches in the previous row's stitches. After a few times around, your piece should be looking like this:

After even more rounds are done, you should have a pouch starting to form:

If you've used scraps of yarn and tied them together like I did for Sammy's mat and the mat above, you can see how you can put the knots on the inside of your stitching to keep them hidden inside the mat. It will eventually be stitched shut (more on that later), so you will never see the knots once you are done. Here's what your "pouch" looks like from one side if you lay it flat:

Step 6 - Continue to crochet round and round until you get the size mat you want or you run out of yarn, whichever comes first. Just kidding. Obviously if you run out of yarn and your mat isn't big enough yet, you will have to get more yarn! When your mat reaches the size you want, DON'T CUT YOUR YARN. Before you cut your yarn, we need to measure how much we need to complete the final assembly of the mat.
Your last stitch should be one stitch before the end of the row, as shown in this picture. In case you didn't notice, the "mat model" has just switched to Sammy's mat. That's because I didn't take pictures of the starting process when I made her mat, so I had to start another one for the first part of the tutorial. Her's wasn't the correct size for the tutorial anyway, but it works for the finishing steps.

Step 7 - The Finishing - In addition to your mat, you will also need a Yarn Needle or large Tapestry Needle. I use a plastic yarn needle purchased at Hobby Lobby that looks like this.

To determine the length of yarn you need for finishing, I lay the yarn loosely back and forth three times across the width of the mat and cut the yarn at the end of the third pass.

Pull the yarn through your ending loop like this:

We're not going to sew the mat together. The first stitch will come over the top of the mat opening to the loop on the opposite side as where you put your final stitch.
We're going to sew across the mat with a weaving stitch. The next pictures show how the first couple of stitches will be made.


Last stitch of the first weaving pass. See the red stitches and how they alternate on each side?

For the second weaving pass, your stitches will go in the opposite spaces as the first pass. The first picture shows how you will turn the corner to begin the second pass.

Starting the second weaving pass:

Second pass after a number of stitches:

When you finish the second pass weave the yarn back into the mat interior and back out a number of stitches in the opposite direction and clip. A slight tug will pull the raw end into the mat interior to hide it.
Good job! You're done. If you started with a 51 stitch chain, your finished mat should look something like this:

Or this:


2 comments:
Very cool, Laura! Will have to try one after I get the dishcloth done.
Elinor read the post with me and says she wants one :-)
I volunteer for a no-kill Dog/Cat rescue shelter and we use 20 x 20 squares just like these for our cat "beds" at the stores (17 Petsmarts in the Denver area) where we house some of them to adopt them out. They are pretty, light weight for transporting and wash well. I have a couple of friends who are going to make some for us, and I've linked them to your site. THANKS, very much.
Myra
melanius@aol.com
Post a Comment